xTool F1 Ultra vs F2: Which Engraver Should You Choose? (November 2026)
Choose the xTool F1 Ultra for portable, flexible work and the xTool F2 when your priority is a broader production workflow. Your choice should follow the materials, object shapes and engraving volume you expect to handle.
On this page (8 sections)
- xTool F1 Ultra vs F2: which one should you choose?
- How does portable work affect the choice?
- Which machine fits metal engraving?
- When does rotary engraving change the decision?
- Which controls can help with repeated jobs?
- What safety steps matter with either engraver?
- How should you decide between the F1 Ultra and F2?
- xTool F1 Ultra vs F2 final decision
Choose the xTool F1 Ultra for portable, flexible work and the xTool F2 for a broader production workflow. In this xTool F1 Ultra vs F2 comparison, the better choice depends on your materials, object shapes, workspace and engraving volume.
The F1 Ultra and F2 belong to different buying paths. The F1 Ultra makes more sense when portability and metal engraving are central, while the F2 deserves closer attention when you want a larger workflow around compatible rotary tools and repeated production.
That distinction matters because a machine that moves well may not suit a fixed bench plan. A machine built for a stationary setup may also feel limiting if you need to carry it to events or shift between rooms.
This comparison focuses on the specific models in your question. We also checked the accessory choices that can change how each machine fits daily engraving work.
Accessories can widen what either machine handles. Rotary options can add tumblers, rings and rounded forms, while control and safety choices can change how repeated jobs feel during a long session.
Start with the work you expect most often. List your main materials, the size and shape of your objects, and how many pieces you plan to finish in a typical day.
Then weigh movement against capacity. If you change location often, a flexible setup may matter more than room for extra stock around the machine.
If the machine will stay in one shop, think about storage, repeatable placement and space for accessories. A fixed plan can support a steadier routine for batch work and custom orders.
Safety planning should sit alongside those practical checks. Confirm the exact manual, enclosure needs and approved materials before you settle on a final configuration.
Used this way, the comparison becomes less about labels and more about fit. The right choice should match the way you actually create, move and finish each project.

xTool F1 Ultra vs F2: which one should you choose?
Pick the xTool F1 Ultra for portable jobs and metal-focused work; pick the xTool F2 when your shop needs a wider production setup. That rule gives you a starting point, but your object shapes and accessory plans may change the decision.
Portable work matters when the engraver must move between a workbench, craft room or customer-facing setup. A compact workflow can be easier to position, especially when you do not have a fixed production area.
Metal engraving also points toward the F1 Ultra when that material is a major part of your work. If your projects include several materials and rounded objects, compare the available rotary path before deciding.
The F2 may suit a more established workspace where the machine stays in one place and your focus is repeatable production. Check the full machine configuration and its approved materials before treating it as the better option.
How does portable work affect the choice?
The F1 Ultra is the stronger match when you expect to move between jobs or work areas. Portability can save setup space, but it does not remove the need for a safe, stable and properly prepared engraving area.
Think about your normal work pattern. If you create personalized metal items in different rooms or take the machine to events, moving the workflow may matter more than maximum production capacity.
A fixed shop changes the priority. You may care more about repeatable positioning, rotary support and room for materials than about moving the machine after every project.
Carrying a machine between spaces also changes how you plan each session. You need a clear surface, a safe power route and enough room to keep stock, tools and finished pieces separate.
Setup time can matter as much as size. If you set up, engrave a few pieces and pack away again, a simpler layout may suit you better than a crowded bench.
A permanent bench allows a different rhythm. You can leave reference marks in place, keep accessories close and focus on steady repetition rather than clearing the surface each time.
Neither approach removes care at the start of a job. Check placement, focus and material position each time, especially after the machine has been moved.
Use the How to Choose a Laser Engraver: A Complete Buying Guide to compare workspace, materials, safety and workflow before you commit to either model.
That guide can help you map the room you have today, not the room you hope to gain later. Measure the bench, doorways and storage before you decide which path fits.
If mobility is a must, plan for safe transport and quick checks on arrival. If the machine will stay put, plan for efficient access and tidy cable control instead.
Which machine fits metal engraving?
The F1 Ultra is the more natural choice when metal engraving is the main reason you are shopping. Confirm the exact metal, finish and machine settings in the official documentation before starting a project.
Metal work can require different preparation from wood, leather or coated items. Your choice should account for the surface finish, the level of detail and whether you need to mark individual pieces or repeat the same design.
The F2 may still make sense if metal is only one part of a wider production plan. In that case, compare the full range of materials you expect to use rather than choosing from one material alone.
For another accessory-based approach, read our guide to a fiber and diode dual laser engraver. It explains why combining laser types can matter when your material list is broad.
When does rotary engraving change the decision?
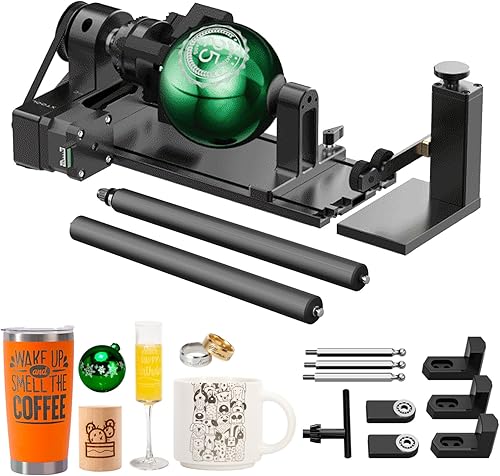
Choose the rotary accessory that matches your object shapes, then confirm whether the F1 Ultra or F2 supports it. Rotary work can expand your projects from flat panels to tumblers, rings, balls, glasses and other rounded objects.
The xTool RA2 Pro supports the F1 Ultra and F2-related workflows through its listed compatibility with the F1 Ultra and other xTool machines. Its 4-in-1 design includes roller, chuck, sphere and ring modules.
The RA2 Pro supports jaws from 0 mm to 100 mm and includes adjustable Z-axis and chuck diameter controls. Its listed maximum vector engraving speed is 360°/s, with a minimum angle of 0.45°.
RA3 takes a different approach. Its MagSwap design lets you change between chuck, roller, sphere and ring attachments without tools, while its 360° LiDAR mapping supports a 3D preview and automatic mode recognition.
RA3 also has a 130 mm chuck and is listed as compatible with the xTool F1 Ultra and F2. Batch processing kits are separate purchases, so include that extra planning step if you expect to engrave several similar objects in one run.
Our comparison of xTool F2 Ultra vs F2 Ultra UV can help if you are also weighing nearby F2 models and different material needs.
Which controls can help with repeated jobs?
A manual button switch can help when you repeat positioning, adjustments or batch engraving steps. It does not change the laser's engraving ability, so treat it as a workflow accessory rather than a reason to choose one machine.
The xTool Button Switch is compatible with the xTool F1, F1 Ultra and F2 Ultra. It uses manual push-button control, a single-action operation and screw terminals with normally open metal contacts.
Its aluminum alloy construction is lightweight. That may suit a bench where you want a separate physical control during material placement or repeated engraving steps.
The main benefit is separation between hand placement and machine control. You can hold small parts steady, check alignment and then use a distinct press when you are ready to continue.
That can reduce awkward reaching across a crowded bench. It may also help when you pause often to swap blanks, check spacing or adjust a piece before the next run.
Single-action control keeps the purpose clear. One press has one job, which can make a repeated sequence easier to follow during longer crafting sessions.
Screw terminals mean the connection is made with hardware rather than a casual plug. Treat that as a setup step to plan carefully, with the machine off and the wiring checked before use.
Normally open contacts also describe how the switch behaves at rest. The circuit stays open until the button is pressed, which suits a simple manual trigger for a defined step.
Lightweight aluminum alloy construction keeps the control easy to place on the bench. It will not add bulk, but it still needs a stable spot where it will not be knocked during work.
Compatibility should be checked first. This switch is listed for the F1, F1 Ultra and F2 Ultra, so it should not be assumed to suit other models.
It also should not be treated as a safety device. Follow the machine instructions for startup, enclosure use, focus, material placement and emergency steps.
For batch work, the value is mostly in rhythm. A clear physical press can mark the start of each repeat without changing speed, power or engraving quality.
If you engrave in long sessions, that small change in posture may matter. Less reaching and fewer interruptions can make repetitive placement feel calmer and more controlled.
The switch does not mean the F1 Ultra or F2 is safer or faster by itself. Follow the machine instructions for startup, material placement, focus, enclosure use and emergency procedures.
What safety steps matter with either engraver?
Use the safety controls and protective equipment specified for your exact machine before engraving. Glasses can add protection, but they do not replace an enclosure, interlock or the safety process in the machine manual.
The xTool Laser Safety Glasses are compatible with listed wavelengths from 316 nm to 450 nm and 900 nm to 1080 nm. They weigh 50 g and are listed as compatible with the xTool F1 Ultra and F2.
Do not assume glasses make an open or unsuitable setup safe. Keep the work area controlled, follow the exact manual and use only materials that the manufacturer permits.
The How to Choose a Laser Engraver? guide gives you another checklist for workspace, controls, materials and safety decisions. For manufacturer information, consult xTool's official site and the documentation for your exact model.
How should you decide between the F1 Ultra and F2?
Choose by your first constraint, not by the machine name alone. If moving the engraver and marking metal are central, start with the F1 Ultra; if your priority is a fixed production workflow, investigate the F2 configuration in more detail.
Use this decision order:
- List the materials you will engrave most often.
- Decide whether the machine must move between work areas.
- Measure the space for the machine, accessories and safe operation.
- Identify whether you need flat work, rotary work or both.
- Check compatibility for the rotary attachment and control accessories.
- Read the safety instructions for the exact machine and laser setup.
If you expect to engrave rings, tumblers or irregular cylinders, the rotary choice may matter as much as the machine choice. RA2 Pro favors broad object support, while RA3 favors fast magnetic changes and smart mapping on its compatible xTool models.
If your projects are mainly portable metal pieces, the F1 Ultra is the clearer starting point. If you are building a stationary workflow with a broader production plan, compare the F2's complete configuration and required accessories before buying.
xTool F1 Ultra vs F2 final decision
Pick the xTool F1 Ultra for portable work and metal engraving, especially when you want flexible rotary options. Pick the xTool F2 when your workspace and production plan point toward a more fixed workflow.
The F1 Ultra pairs naturally with RA2 Pro for broad cylindrical work or RA3 for magnetic changes and 360° LiDAR mapping. The F2 can also fit an accessory-led setup, but confirm the exact compatibility for the model and configuration you plan to buy.
That accessory check should happen before purchase, not after delivery. Compatibility lists can differ by model, so use the exact names in the product data for your planned machine.
For rotary work, shape should guide the choice. Tumblers, glasses, rings, balls and irregular cylinders each place different demands on grip, support and alignment.
RA2 Pro suits a broad mix of rounded objects through its roller, chuck, sphere and ring modules. RA3 suits a workflow where faster magnetic changes and preview support matter more.
Neither rotary option turns flat work into a concern. If most of your projects are panels or flat blanks, choose the machine for those jobs first and treat rotary as a later addition.
Portable work remains the clearest reason to start with the F1 Ultra. If you move between rooms, events or client spaces, that flexibility can shape every session.
A fixed production plan points the other way. When the machine stays in one shop, repeatable placement and accessory storage may deserve more weight.
For a closer look at the smaller machine's strengths, read our xTool F1 Ultra review. Your best choice is the one that matches your materials, movement needs, object shapes and safety setup.
Make the final call by ranking your constraints in order. Put safety and approved materials first, then movement, object shape, volume and accessory plans.
If those checks still leave the choice close, return to your most common project. The machine that fits that work best on an ordinary day is usually the safer long term pick.
Frequently asked questions
Is the xTool F1 Ultra better than the F2?
The xTool F1 Ultra is the better fit when portable work, flexible setup and metal engraving are your main goals. Choose the xTool F2 when your workflow calls for its broader machine platform.
Compare the exact materials, object sizes and production steps you plan to use before choosing.
Can the xTool F1 Ultra use a rotary attachment?
Yes, the xTool F1 Ultra is listed as compatible with both the xTool RA2 Pro and RA3 rotary attachments. RA2 Pro supports roller, chuck, sphere and ring engraving, while RA3 adds MagSwap changes, 360° LiDAR mapping and a 130 mm chuck.
Can the xTool F2 use the xTool RA3?
Yes, the xTool F2 is listed as compatible with the xTool RA3 World's First Smart MagSwap Rotary. RA3 includes chuck, roller, sphere and ring attachments, plus 360° LiDAR mapping and automatic mode recognition for its supported workflow.
What should you compare in an xTool F1 Ultra vs F2 decision?
Compare the materials you need to engrave, how often you move the machine, the object shapes you handle and whether rotary setup matters. Also check the required safety process, available workspace, software workflow and accessory compatibility for the exact F1 Ultra or F2 configuration.