How to Use Cricut Explore Air 2
To use Cricut Explore Air 2, connect it to Design Space, choose a project, load a mat with material, select the right setting, and press Go. Start with a simple shape or card so you can learn the cut, unload, and weed steps before making a larger project.
On this page (10 sections)
- How to Use Cricut Explore Air 2
- What is Cricut Explore Air 2?
- What do you need before your first cut?
- How do you connect Cricut Explore Air 2 to Design Space?
- How do you prepare the design?
- How do you load material and make the first cut?
- How do you remove and finish a vinyl cut?
- What can you add to an Explore Air 2 project?
- How do you fix common Cricut Explore Air 2 problems?
- What is the best first project for Cricut Explore Air 2?
How to Use Cricut Explore Air 2
To use Cricut Explore Air 2, connect it to Cricut Design Space, choose a design, place material on a mat, set the material type, and start the cut. The machine then follows the selected design so you can unload, weed, and apply the finished project.
If you are still deciding which machine suits you, read our guide to what is a vinyl cutting machine and compare the best Cricut Explore machine options.
What is Cricut Explore Air 2?
Cricut Explore Air 2 is a smart cutting machine for craft materials such as vinyl, cardstock, paper, and iron-on. It connects to a computer or mobile device through Cricut Design Space, where you create or select a design before sending it to the machine.
The machine is useful for decals, labels, cards, signs, apparel decorations, and other small craft projects. It can cut shapes and letters, and it can work with compatible tools for drawing or other decorative steps.
For pen choices, see pens for Cricut Explore.
The word “Air” refers to the wireless connection used with compatible devices. If you are comparing models, our guide to Cricut Explore vs Explore Air explains the differences in plain terms.
What do you need before your first cut?
You need the Cricut machine, a compatible device with Design Space, a cutting mat, the correct blade and housing, and material that suits the project. If its cord needs replacing, compare replacement power cords for Cricut Explore.
Keep a weeding tool, scraper, and a flat work surface nearby for vinyl projects.
For a first project, choose a simple shape or short word. Small designs use less material and make it easier to see whether the pressure, mat grip, and material setting are working together.
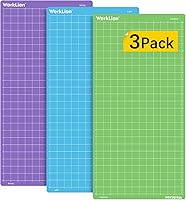
The WORKLION Cutting Mat 12x24 Compatible With Explore provides 3 adhesive mats in standard, light, and strong grip levels, each with a 12 in x 24 in gridded area.
Use a light-grip mat for lightweight paper or vinyl when a strong hold could make removal difficult. A standard mat suits many common materials, while a strong mat can help hold thicker cardstock, faux leather, poster board, chipboard, or backed fabric.
Keep the clear film cover on the mat during storage. Scrape away scraps after use, and hand-wash the mat if needed according to its care instructions.
How do you connect Cricut Explore Air 2 to Design Space?
Install Cricut Design Space on your compatible computer or mobile device, then follow the connection prompts for Cricut Explore Air 2. The app is where you select a project, edit the design, choose the material setting, and send the cut.
Open Design Space and sign in if prompted. Choose a new project or an existing design, then check the design on the canvas before continuing.
Set the size carefully. Confirm that letters are attached in the intended arrangement and that mirrored designs are enabled when required for iron-on material.
Cricut's Design Space help center provides current connection and software guidance. App menus can change, so use the instructions shown for your device.
How do you prepare the design?
Place the design on the canvas, set its size, and make sure every part is arranged before selecting Make. A cut machine follows the design you send, so a quick canvas check can prevent wasted material.
For a decal, type or upload the words, choose a readable size, and weld letters when they should cut as one connected shape. For separate labels, keep the elements separate so you can arrange them after cutting.
Use Attach when you need parts to keep their positions on the mat. Without it, Design Space may rearrange separate elements to save material.
Click Make when the design is ready. Review the mat preview and confirm that the design fits the material you plan to load.
How do you load material and make the first cut?
Place the material on the mat with the working side facing up, press it flat, and load the mat into the machine. Then choose the matching material setting and press the start button when Design Space prompts you.
- Put the material on the correct area of the mat.
- Smooth it from the center toward the edges.
- Move the machine's rollers aside if the material instructions require it.
- Align the mat with the guides.
- Press the load or unload button.
- Turn the dial or choose the material setting shown in Design Space.
- Press Go and let the machine finish.
Don't pull the mat while the blade is moving. Wait for the cut to stop, then press the unload button.
Run a small test cut first when you are unsure about a material. A test can show whether the blade cuts through the material without cutting too deeply into the mat.
How do you remove and finish a vinyl cut?
Remove the excess vinyl first, weed the small pieces, and transfer the remaining design only after checking every letter and shape. Work slowly around thin lines and small openings.
Lift the mat away from the material instead of bending the material sharply. This can help reduce curling, especially with paper and cardstock.
For adhesive vinyl, remove the unwanted vinyl around the design. Use a weeding tool for the small interior pieces, then apply transfer tape if your design needs to move as one piece.
For iron-on material, follow the material's specific application instructions. Mirror the design before cutting when the material requires it.
What can you add to an Explore Air 2 project?
You can add drawn lines, foil details, or layered materials when the tool and material match the project. Keep each decorative step clear in Design Space so the machine knows which operation comes first.
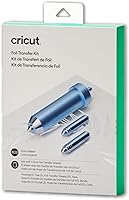
The Cricut Foil Transfer Kit is designed for Cricut Maker and Explore machines. It includes 12 foil transfer sheets in gold and silver, 3 interchangeable fine, medium, and bold tips, a tool housing, and adhesive tape.
The kit suits cards, invitations, and gift boxes that need foil accents without heat. Choose the tip that matches the line weight you want, secure the foil and card with the tape, and follow the Design Space prompts.
The Cricut Explore® 5 Essential Bundle + Digital Content, Taupe is a newer Explore-family option for readers who want a complete starting bundle. It includes supplies for up to 65 projects, works with more than 100 materials, connects to Design Space through Bluetooth, and includes bonus digital content.
Explore 5 can cut, write, draw, foil, and score with compatible tools. It is 30% more compact than previous models and has a simplified interface, but it is not the same machine as Explore Air 2.
For the next model's workflow, read how to use Cricut Explore 3 or how to use Cricut Explore 4.
How do you fix common Cricut Explore Air 2 problems?
Start with the mat, material setting, blade housing, and design preview when a cut goes wrong. These checks cover the most common setup mistakes without changing several variables at once.
If the material moves, clean loose scraps from the mat and press the material down again. Use a grip level suited to the material rather than assuming the strongest mat will work best.
If the blade does not cut through, confirm the selected material setting and check that the blade housing is seated correctly. If it still drags, compare replacement blades for Cricut Explore.
Make a small test cut before sending the full project again.
If the design is cut in the wrong place, review the canvas size, mat preview, and material position. If letters are separated or rearranged, return to the canvas and use Attach or Weld where appropriate.
If a foil or pen step is misaligned, confirm that the tool is fully inserted and that the material has not shifted. Follow the operation order shown in Design Space.
What is the best first project for Cricut Explore Air 2?
A small single-layer vinyl decal or simple cardstock shape is the best first project because it teaches the full workflow with fewer failure points. You can practice designing, mat loading, cutting, unloading, weeding, and applying the result.
Choose a design with broad shapes and limited small details. Once the first cut works, try layered colors, cards, iron-on designs, or foil accents.
Pick the WORKLION mat set if you need different grip levels for future materials. Pick the Cricut Foil Transfer Kit if your main goal is decorative card or invitation work.
Consider the Cricut Explore 5 bundle if you are comparing a newer machine with included supplies.
The key to learning how to use Cricut Explore Air 2 is to change one setting at a time. Start with a test cut, keep the material flat, and use the Design Space preview before every full project.
Frequently asked questions
What is Cricut Explore Air 2?
Cricut Explore Air 2 is a smart cutting machine for making designs from materials such as vinyl, cardstock, iron-on, and paper. You control it through Cricut Design Space, then load a mat and material so the machine can draw, score, or cut the selected design.
What is a Cricut Explore Air 2 used for?
A Cricut Explore Air 2 can cut designs for decals, cards, labels, signs, apparel projects, and paper crafts. It can also work with compatible pens and other tools, so your project may combine cutting, drawing, and decorative details.
What can Cricut Explore Air 2 do?
Cricut Explore Air 2 can cut many common craft materials when you use the correct blade, mat, and material setting. It can make vinyl decals, iron-on designs, cardstock shapes, and cards, while Design Space helps you arrange and send the project to the machine.
Why is my Cricut Explore Air 2 not cutting correctly?
Incorrect material settings, a worn or dirty mat, loose material, and an unsuitable blade can all affect a cut. Recheck the material choice in Design Space, press the material firmly onto the mat, make sure the blade housing is seated, and run a small test cut before repeating the full design.