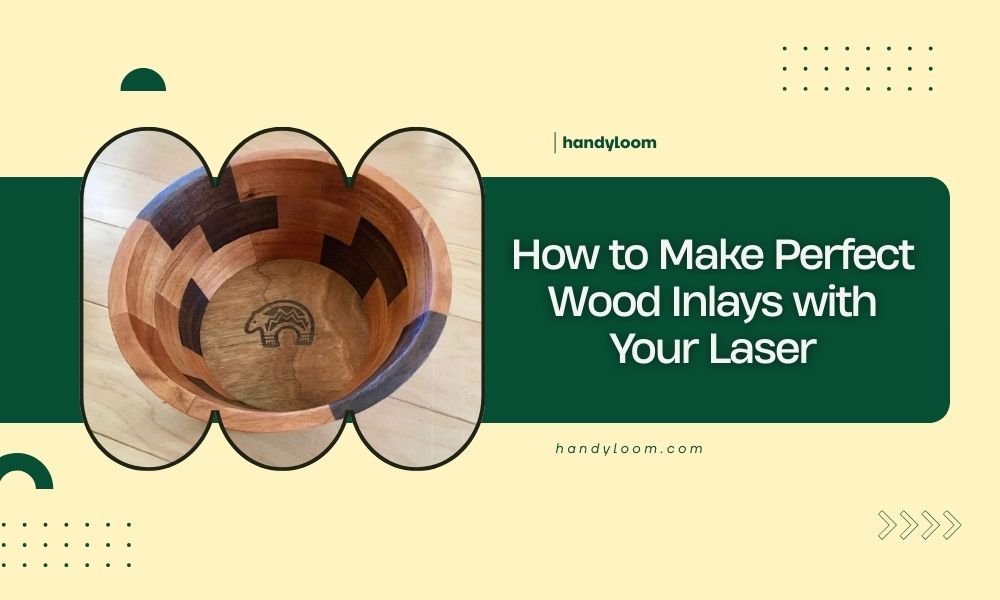
Wood inlays with your laser require precise cutting of both the base wood and inlay material, followed by careful fitting and gluing to create seamless decorative patterns.
Perfect laser-cut wood inlays start with matching wood grain direction, using test cuts to dial in settings, and creating slightly oversized inlay pieces that you sand to fit.
Understanding Wood Inlay Basics
Wood inlay is like creating a wooden puzzle where one piece fits perfectly into another. You cut a cavity in your base wood, then fill it with a contrasting wood piece.
Your laser cutter makes this process much easier than traditional hand tools. You get clean cuts and can repeat patterns with perfect accuracy.
Best Wood Combinations for Laser Inlays
I found that contrasting colors work best for visible results. Dark walnut base with light maple inlay creates stunning results. Cherry and maple also pair beautifully.
Hardwoods generally work better than softwoods. They cut cleaner and hold tight tolerances. Avoid woods with high resin content like pine.
Essential Tools and Materials
You’ll need your laser cutter, wood glue, clamps, and fine sandpaper. A caliper helps measure precise thicknesses. Keep some backup wood pieces ready for test cuts.
Planning Your Inlay Design
Start simple. Geometric shapes work better than organic curves for beginners. Straight lines and basic shapes are more forgiving if your cuts aren’t perfect.
Design Software Considerations
Your design software needs to create two matching pieces. Most people use separate layers for the cavity and inlay piece. This lets you adjust each cut independently.
Make your inlay piece slightly larger than the cavity. You’ll sand it down to fit perfectly. This gives you room to fix small errors.
Grain Direction Matters
Match grain direction between your base and inlay pieces. Wood expands and contracts along grain lines. Mismatched grain creates gaps over time.
I learned this the hard way when my first inlay cracked after a few months. The woods were moving in different directions.
Laser Settings for Different Woods
Each wood type needs different power and speed settings. Start with manufacturer recommendations, then test on scrap pieces.
| Wood Type | Power (%) | Speed (mm/min) | Passes |
|---|---|---|---|
| Maple | 75-85 | 300-400 | 1-2 |
| Walnut | 65-75 | 350-450 | 1-2 |
| Cherry | 70-80 | 325-425 | 1-2 |
| Oak | 80-90 | 250-350 | 2-3 |
Test Cuts Are Your Friend
Never cut your final pieces without testing first. Use the same thickness wood as your project. What works on thin veneer won’t work on thick stock.
Cut small test squares and check if they fit together snugly. You want slight resistance when pushing pieces together by hand.
Managing Kerf Width
Your laser beam removes material as it cuts. This kerf width affects how pieces fit together. Thicker materials and higher power create wider kerfs.
Compensate by making your cavity slightly larger or your inlay slightly smaller. This takes practice to get right.
Step-by-Step Cutting Process
Preparing Your Wood
Sand both pieces to the same grit level before cutting. This ensures even laser penetration. Clean off any dust or debris that might interfere with cutting.
Check thickness with calipers. Even small variations affect how pieces fit together.
Cutting the Base Cavity
Cut your cavity first. This gives you a reference for sizing your inlay piece. Use multiple passes at lower power rather than one high-power pass for cleaner edges.
Clean out any char or debris immediately after cutting. A small brush or compressed air works well.
Avoiding Burn Marks
Lower power with more passes reduces burning. You can also use masking tape to protect surfaces, though it makes fitting more difficult.
Cutting the Inlay Piece
Make your inlay piece about 0.002-0.005 inches larger than the cavity. This sounds tiny, but it makes a big difference in fit.
Test fit frequently. You should feel slight resistance when inserting the piece, but it shouldn’t require hammering.
Fine-Tuning the Fit
Use 220-grit sandpaper to adjust sizing. Sand lightly and test often. It’s easy to remove too much material.
Focus on high spots first. The piece will tell you where it’s binding by the resistance you feel.
Assembly and Finishing
Gluing Techniques
Use a thin layer of wood glue in the cavity. Too much glue creates hydraulic pressure and prevents full seating.
Work quickly but carefully. Most wood glues give you 5-10 minutes of working time before they start setting.
Clamping Methods
Even pressure across the entire inlay prevents gaps. Use cauls (scrap wood pieces) to distribute clamping pressure evenly.
Check for glue squeeze-out and clean it immediately. Dried glue interferes with finishing later.
Clamping Time and Pressure
Research from woodworking experts shows that moderate pressure for longer time works better than high pressure for short time. Aim for firm pressure overnight.
Sanding and Leveling
Start with 120-grit sandpaper to level any height differences. Progress through 150, 220, and 320 grits for smooth results.
Sand with the grain direction of your base piece. Cross-grain scratches show up clearly, especially on contrasting woods.
Common Problems and Solutions
Gaps Around the Inlay
Small gaps happen. Mix fine sawdust from your woods with glue to create matching filler. This disguises minor fitting issues.
Uneven Depth
Your laser focus might drift across large pieces. Check focus regularly and adjust if needed. Consider cutting in smaller sections for large inlays.
Thickness Variations
Wood thickness varies even in the same board. Measure and mark thickness variations. Adjust your laser settings accordingly.
Burning and Charring
Reduce power or increase speed. Multiple light passes work better than single heavy cuts for clean edges.
Some woods burn more easily. Cherry and maple char less than oak or pine.
Advanced Techniques
Multi-Level Inlays
Create depth by cutting cavities at different levels. This adds visual interest but requires precise depth control.
Curved and Complex Shapes
Start with simple curves before attempting complex shapes. Your laser handles curves well, but fitting becomes more challenging.
Managing Stress Points
Sharp inside corners create stress points where wood might crack. Add small radius cuts to reduce stress concentration.
Conclusion
Making perfect wood inlays with your laser takes practice, but the results are worth the effort. Start with simple shapes and contrasting woods to build your skills. Focus on getting clean cuts, proper fit, and good glue coverage. Remember that test cuts save time and materials in the long run. With patience and practice, you’ll create beautiful inlays that look professionally made. Each project teaches you something new about wood behavior and laser settings.
What’s the best wood thickness for beginner inlay projects?
Start with 1/4 inch thickness for both base and inlay pieces. This thickness is easier to cut cleanly, fits well in most laser cutters, and gives you room to sand level after assembly without breaking through.
How do you prevent inlay pieces from falling through the cavity?
Cut your cavity about 0.005 inches smaller than your inlay piece, then sand the inlay to fit. The piece should require gentle pressure to seat fully but shouldn’t fall through on its own.
Can you use softwood and hardwood together in inlays?
Yes, but matching expansion rates is tricky. Softwoods move more than hardwoods with humidity changes. If you mix them, keep pieces small and use flexible finishes that can handle slight movement.
What’s the maximum depth you can cut for inlays?
Most lasers handle up to 1/2 inch depth effectively, but quality decreases with depth. For deeper inlays, use multiple passes or consider routing the cavity and using your laser just for the inlay piece.
How long should glue dry before sanding inlays flush?
Wait at least 24 hours for full cure before heavy sanding. You can do light leveling after 4-6 hours, but aggressive sanding too early can shift the inlay position and create gaps.