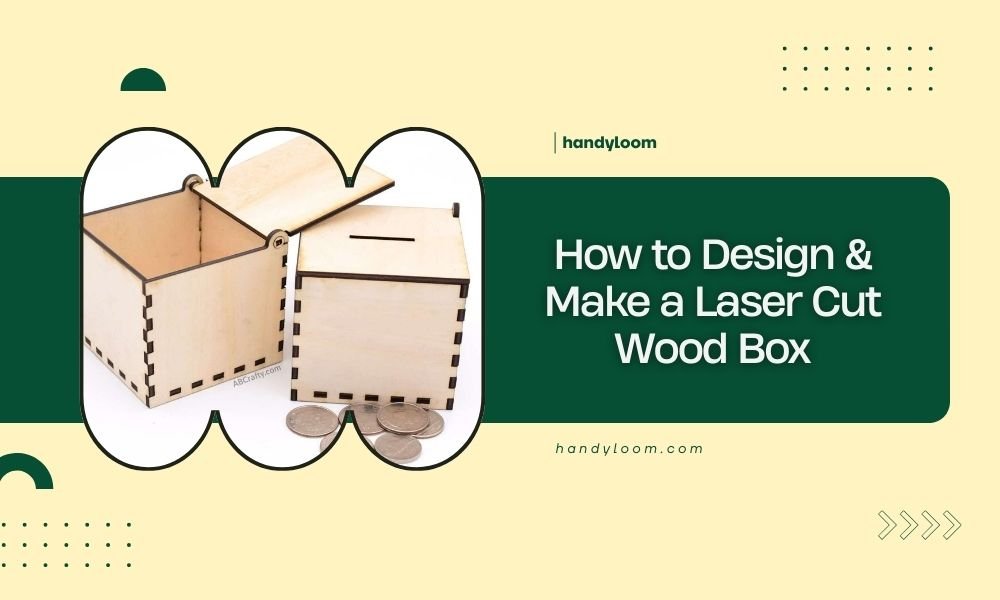
To design and make a laser cut wood box, you need a digital design file, wood material, and access to a laser cutting machine. The process involves creating your design in CAD software, setting proper cut parameters, and assembling the pieces with tabs and slots.
Most wooden boxes use 3-6mm thick plywood or MDF, with finger joints or living hinges for connection. The entire project typically takes 2-4 hours from design to finished product.
Planning Your Wood Box Design
Before you touch any software, grab a pencil and sketch your box idea. What size do you need? Will it have a lid? Any compartments inside?
Think about your box like building with digital Lego blocks. Each wall needs to connect perfectly with its neighbors. This planning stage saves hours of frustration later.
Choose Your Box Dimensions
Start with the inside measurements first. If you’re making a jewelry box, measure your jewelry. Need room for tea bags? Measure those.
Add your material thickness to get outside dimensions. A 4-inch inside width becomes 4.24 inches outside with 3mm wood (about 0.12 inches thick).
Select Wood Material and Thickness
Plywood works best for beginners. It’s cheap, cuts clean, and doesn’t warp much. Birch plywood gives you smooth surfaces that look professional.
MDF cuts beautifully but creates more dust. Solid wood looks amazing but costs more and can crack along the grain.
Common Thickness Options
- 3mm (1/8 inch) – Perfect for small decorative boxes
- 6mm (1/4 inch) – Good balance of strength and detail
- 9mm (3/8 inch) – Strong boxes, but limited detail cutting
Design Software Options
You don’t need expensive software to create stunning boxes. Free options work great for most projects.
Free Design Programs
Inkscape handles vector graphics perfectly and exports clean files for laser cutting. The learning curve feels steep at first, but YouTube tutorials make it manageable.
Fusion 360 offers free personal licenses and creates precise 3D models. You can see how your box fits together before cutting.
Online Box Generators
Makercase.com generates instant box designs from your measurements. Just enter dimensions, pick joint types, and download your files.
Boxes.py creates parametric boxes with dozens of joint styles. It runs in your web browser and outputs ready-to-cut files.
Box Generator Pros and Cons
Generators save time but limit creativity. They’re perfect for simple storage boxes. Custom designs need manual drawing.
Joint Types for Laser Cut Boxes
Joints determine how strong your box feels and how easy it assembles. Pick the right style for your skill level and tools.
Finger Joints (Box Joints)
Finger joints look professional and hold tight without glue. The interlocking fingers spread stress across multiple contact points.
Make fingers about 2-3 times your material thickness. Thicker fingers are stronger but look chunky on small boxes.
Tab and Slot Connections
Simple rectangular tabs slide into matching slots. Easy to design and forgiving if your measurements are slightly off.
Size tabs about 80% of your material thickness. This gives you room for wood expansion and cutting variations.
Living Hinge Lids
Living hinges cut thin lines that bend without breaking. They create attached lids that never get lost.
Space hinge cuts about 1-2mm apart. Test on scrap material first – each wood type bends differently.
Creating Your Design File
Now comes the fun part. Time to turn your sketch into a precise cutting file.
Set Up Your Document
Create a new document sized for your laser bed. Most hobby lasers cut 12×20 inches or smaller areas.
Set units to millimeters or inches – whatever your laser software uses. Mixing units causes sizing headaches.
Draw Your Box Panels
Start with the bottom panel – it’s usually a simple rectangle. Then draw each wall, adding joint features as you go.
Keep cut lines red and thin (0.1mm works well). Many laser operators use this color coding system.
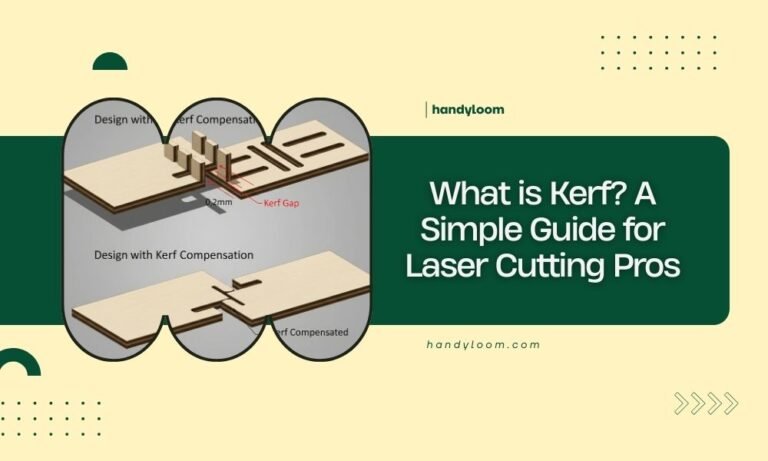
Account for Kerf Width
Laser beams have width, called kerf. This removes material from both sides of your cut line.
Most lasers remove 0.1-0.2mm total width. Test cuts help you find your exact kerf measurement.
Laser Cutting Parameters
Getting clean cuts requires matching your laser settings to your material. Wrong settings create charred edges or incomplete cuts.
Power and Speed Settings
Start with your laser manufacturer’s recommended settings for your wood thickness. Every machine cuts slightly different.
Lower power with multiple passes often beats high power single passes. You get cleaner edges with less burning.
Test Cut First
Always test on scrap material before cutting your final pieces. A small test square saves expensive mistakes.
Check that cuts go completely through without excessive burning. Adjust power or speed as needed.
Air Assist and Material Support
Air assist blows smoke away from your cut line. This prevents residue buildup and reduces fire risk.
Support your material evenly. Sagging wood creates angled cuts that won’t fit together properly.
Assembly Process
Your pieces are cut – time for the puzzle phase. Take your time here. Rushed assembly often means starting over.
Dry Fit Everything First
Assemble your box without glue to check fit and identify problems. Tight joints might need light sanding.
Mark any pieces that need adjustment. It’s much easier to fix issues now than after gluing.
Sanding and Finishing
Light sanding removes laser char and smooths rough edges. Start with 220-grit sandpaper for most jobs.
Clean all dust before applying finish. Tack cloths work better than regular rags for final cleaning.
Glue Application
Wood glue creates strong, permanent joints. Apply thin, even coats to avoid squeeze-out mess.
Clamp gently – too much pressure can starve joints of glue. Just enough to close gaps works best.
Common Design Mistakes to Avoid
Learning from others’ mistakes saves time and materials. Here are the biggest rookie errors I found in online forums.
Forgetting Material Thickness
This trips up almost everyone once. Your 4-inch box interior needs 4.24-inch exterior panels with 3mm wood.
Double-check every measurement includes material thickness where needed. Draw it out if you’re unsure.
Ignoring Wood Grain Direction
Wood bends easier across the grain than along it. Living hinges must run perpendicular to grain direction.
Plan your panel layout to use grain direction for strength where you need it most.
Making Joints Too Tight
Laser kerf varies with material moisture, cutting speed, and beam focus. Joints that fit perfectly on test pieces might be too tight on final cuts.
Build in 0.05-0.1mm clearance for assembly wiggle room.
Advanced Design Features
Once you master basic boxes, these features add professional touches that impress everyone.
Engraved Decorations
Laser engraving adds text, patterns, or images to your box surfaces. Use different power settings for engraving versus cutting.
Test engraving depth on scrap first. Too deep weakens the wood, too shallow looks faint.
Internal Compartments
Dividers turn simple boxes into organized storage. Plan compartment sizes for specific items you’ll store.
Internal walls need their own joints – usually simple slots work fine for non-structural dividers.
Magnetic Closures
Small neodymium magnets create invisible closures that feel magical. Drill or cut recesses so magnets sit flush.
Use pairs of magnets with opposite poles facing each other. Mark polarity to avoid assembly confusion.
Troubleshooting Cut Problems
Even experienced makers hit snags sometimes. Here’s how to fix the most common cutting issues.
Incomplete Cuts
If pieces don’t separate cleanly, increase laser power or decrease cutting speed. Check that your material lies flat against the cutting bed.
Multiple light passes often work better than single heavy passes for thick materials.
Excessive Burning
Charred edges happen when laser power is too high or cutting speed too slow. Reduce power first, then try faster speeds.
Better air assist helps blow combustion products away from the cut zone.
Conclusion
Making laser cut wood boxes combines digital design skills with traditional woodworking satisfaction. Start with simple rectangular boxes using online generators, then gradually add custom features as your confidence grows. The key is planning your joints carefully, testing your cuts on scrap material, and taking time for proper assembly. With practice, you’ll create professional-looking boxes that rival store-bought alternatives at a fraction of the cost.
What file formats work best for laser cutting wood boxes?
SVG and DXF formats work with most laser cutting software. SVG preserves colors for different operations (red for cutting, blue for engraving), while DXF focuses purely on geometry. Both maintain sharp vector lines that lasers need for clean cuts.
How tight should finger joints be for laser cut boxes?
Finger joints should slide together with light hand pressure but not fall apart on their own. Allow 0.05-0.1mm clearance from your test measurements to account for material variations and laser kerf differences between cuts.
Can you laser cut solid hardwood for boxes?
Yes, but hardwoods require more laser power and slower cutting speeds than plywood. Dense woods like oak or maple may char more easily. Cherry and walnut laser cut beautifully with proper settings, creating premium-looking boxes.
What’s the minimum wall thickness for small decorative boxes?
Use at least 3mm (1/8 inch) thickness for structural integrity. Thinner materials work for large panels but may crack at joint connections. Very small boxes under 2 inches can use 1.5mm material if joints are well-designed.
How do you prevent laser cut wood from warping after cutting?
Store cut pieces flat with weight on top until assembly. High laser heat can introduce internal stresses that cause warping hours later. Sealing both sides of finished boxes with the same finish prevents moisture-related movement.