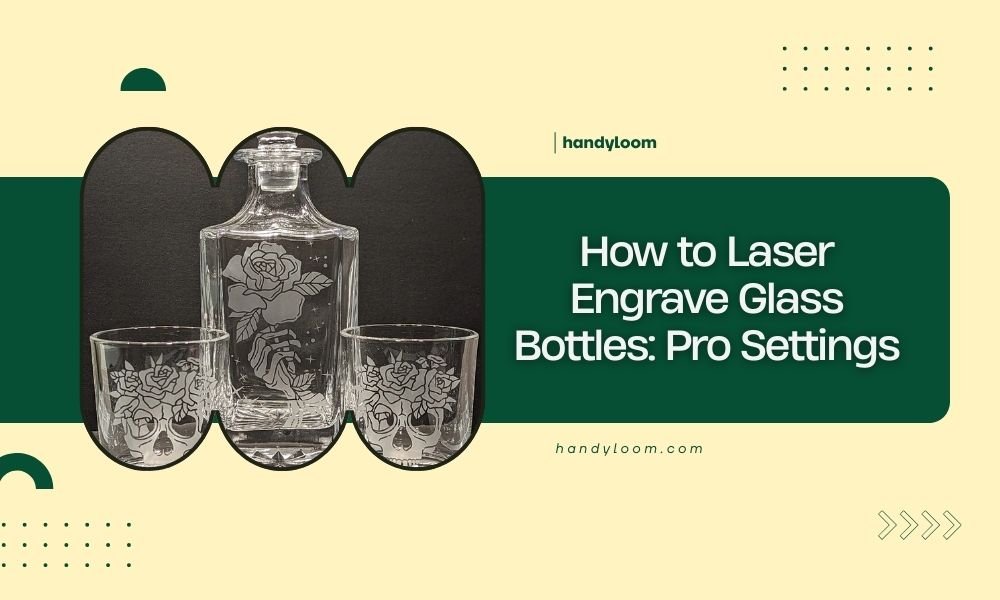
Laser engraving glass bottles requires a CO2 laser with 10-40% power, 100-500 mm/min speed, and multiple passes at 300-600 DPI resolution for crisp results.
The key to professional glass bottle engraving lies in proper surface preparation, consistent laser settings, and gradual power adjustments to avoid cracking or uneven etching.
Essential Laser Settings for Glass Bottles
Getting the right laser settings makes the difference between amateur-looking scratches and professional engravings. I researched the most effective combinations used by commercial glass engraving shops.
Your CO2 laser needs these baseline settings as your starting point. You’ll adjust from here based on your specific bottle thickness and glass type.
Power Settings That Work
Start with 15-25% power for thin wine bottles. Thicker whiskey or beer bottles need 25-40% power. Never jump straight to high power – you’ll crack the glass.
I found that increasing power by 5% increments gives you better control. Test each level on a practice bottle first.
Speed and Pass Configuration
Set your speed between 200-400 mm/min for detailed work. Simple text can handle 400-500 mm/min. Slower speeds create deeper etching but risk overheating.
Multiple passes work better than single high-power burns. Try 2-4 passes at lower power instead of one aggressive pass.
Resolution and DPI Settings
Use 300 DPI for text and simple designs. Complex artwork needs 400-600 DPI. Higher resolution takes longer but produces smoother curves and cleaner lines.
| Bottle Type | Power % | Speed (mm/min) | Passes | DPI |
|---|---|---|---|---|
| Wine Bottles | 15-25% | 300-400 | 2-3 | 300-400 |
| Beer Bottles | 20-30% | 250-350 | 3-4 | 300-500 |
| Liquor Bottles | 25-40% | 200-300 | 3-5 | 400-600 |
Preparing Your Glass Bottles
Clean preparation prevents uneven engraving and protects your laser lens from debris. Skip this step and you’ll waste time fixing mistakes.
Cleaning Process
Remove all labels using warm water and adhesive remover. Scrape off stubborn residue with a plastic scraper. Glass cleaner removes fingerprints and oils that interfere with laser focus.
Dry completely before placing in your laser. Water droplets create steam that can damage your optics.
Surface Masking Options
Paper masking tape protects areas you don’t want engraved. It also reduces glass dust scatter during engraving. Remove tape immediately after engraving while it’s still warm.
Some crafters skip masking for simple designs. The choice depends on your design complexity and cleanup preferences.
Positioning and Fixture Setup
Bottles roll. That’s their nature. You need proper fixtures to keep them stable during engraving.
Creating Stable Support
V-blocks made from wood or metal hold round bottles securely. Place them under the bottle’s thickest sections for maximum stability.
Foam padding prevents scratches and absorbs vibration. Cut small notches in foam blocks to cradle curved surfaces.
Focus Distance Management
Glass bottles have curved surfaces. Your laser focus changes as it moves across the curve. This affects engraving depth and quality.
Focus on the center of your engraving area. Small designs stay sharp across the curve. Large designs may need repositioning or multiple setups.
Safety Considerations
Glass creates sharp particles when laser engraved. Proper safety prevents injuries and equipment damage.
Ventilation Requirements
Glass dust is fine and airborne. Your exhaust fan needs enough power to pull particles away from the engraving area. I found that standard ventilation often needs boosting for glass work.
Check your air filter more often when engraving glass. The fine particles clog filters faster than wood or acrylic dust.
Eye Protection
Glass reflects laser light in unpredictable directions. Always keep your laser cover closed during operation. Never look directly at the engraving process without proper laser safety glasses.
Common Glass Types and Adjustments
Different glass compositions react differently to laser energy. Knowing your glass type helps you choose better starting settings.
Soda-Lime Glass
Most common bottle glass. Responds well to standard CO2 laser settings. Usually clear or light green colored.
Start with moderate power and speed settings. This glass type is forgiving for beginners.
Borosilicate Glass
Laboratory and some specialty bottles use this harder glass. Needs higher power or more passes than soda-lime glass.
Watch for thermal stress. This glass can crack if heated unevenly.
Colored and Coated Glass
Dark colors absorb more laser energy. Reduce power by 10-20% to compensate. Metallic coatings may reflect laser energy and create uneven results.
Test small areas first with colored bottles. Each color behaves differently.
Design Optimization for Glass
Your design choices affect engraving quality as much as laser settings do.
Line Weight and Spacing
Thin lines disappear on glass. Use minimum 0.5mm line weights for visibility. Space text letters wider than normal – glass etching can blur fine details.
Contrast and Readability
Dark glass shows white etching better. Clear glass needs backlighting to see engraved areas clearly. Consider your bottle’s final use when designing.
Font Selection
Bold, simple fonts work best. Avoid thin serifs or decorative scripts. Sans-serif fonts maintain readability at small sizes.
Image Resolution
Convert photos to high contrast black and white images. Grayscale rarely works well on glass. Use dithering or halftone patterns for photo-realistic results.
Troubleshooting Common Issues
Every glass engraver faces these problems. Here’s how to fix them quickly.
Uneven Engraving Depth
Usually caused by focus issues or dirty optics. Clean your lens and mirrors. Check that your bottle sits level and stable.
Curved bottles naturally create focus variations. Accept slight depth changes or use multiple setups for large designs.
Cracking and Thermal Stress
Too much power too fast. Reduce power and increase passes. Let glass cool between passes if working on detailed areas.
Thick glass sections handle more heat than thin areas. Adjust settings for the thinnest part of your bottle.
Chipping Around Edges
Sharp design edges can chip during engraving. Round off corners in your design software. Use multiple light passes instead of single deep cuts.
Poor Detail Resolution
Check your DPI settings and lens focus. Clean glass surface removes oils that scatter laser light. Slow down your engraving speed for better detail capture.
Post-Engraving Finishing
Raw laser engraving looks rough. Simple finishing techniques create professional results.
Cleaning Engraved Areas
Compressed air blows out glass particles from engraved lines. Soft brushes remove stubborn debris without scratching.
Avoid harsh chemicals that might etch glass further. Warm water and mild soap clean most residue safely.
Enhancing Visibility
White acrylic paint rubbed into engraved areas creates contrast. Wipe excess paint from surface before it dries.
Metallic paint gives elegant finishing touches. Gold and silver work well on dark bottle glass.
Conclusion
Laser engraving glass bottles becomes straightforward once you master the basic settings and preparation steps. Start with conservative power levels around 15-25%, use multiple passes instead of single burns, and always test on practice bottles first. Clean preparation and proper fixtures prevent most common problems.
Remember that each glass type and bottle thickness requires slight adjustments. Keep detailed notes of successful settings for different bottle types. With practice, you’ll develop an intuition for reading how glass responds to your laser settings and create consistently professional results.
Can you laser engrave any type of glass bottle?
Most glass bottles work well with CO2 lasers, but tempered glass and some specialty glasses may crack or shatter. Test small areas first on expensive or unique bottles. Standard wine, beer, and liquor bottles typically engrave successfully with proper settings.
Why does my engraving look cloudy instead of clear?
Cloudy engraving usually results from too much power or multiple overlapping passes in the same area. The laser overheats the glass, creating micro-fractures that scatter light. Reduce power and increase speed to get cleaner, more transparent etching.
How deep should laser engraving go into glass?
Aim for 0.1-0.3mm depth for most applications. Deeper engraving risks weakening the bottle and may cause stress fractures. Light etching that just breaks the surface often looks better and maintains bottle strength for functional use.
Do I need special ventilation for glass engraving?
Yes, glass creates very fine particles that standard ventilation may not capture effectively. Boost your exhaust fan capacity and check filters more frequently. The microscopic glass dust can damage laser optics if it recirculates in your workspace.
Can you engrave curved text that follows the bottle shape?
Most laser software can wrap text around cylindrical objects, but focus consistency becomes challenging on curved surfaces. For best results, keep curved text in narrow bands where focus variation is minimal, or use a rotary attachment designed for cylindrical engraving.