PWM stands for Pulse Width Modulation, a method that controls laser power by rapidly switching the laser on and off in precise intervals.
This technique lets you adjust cutting depth, engraving intensity, and material processing speed by changing how long the laser stays on versus off during each pulse cycle.
How PWM Controls Your Laser’s Power Output
Think of PWM like a light dimmer switch, but way more precise. Instead of reducing voltage, it controls power by turning your laser completely on and off thousands of times per second.
When you set your laser to 50% power, PWM keeps it on for half the time and off for the other half. At 25% power, it’s on for one-quarter of each cycle and off for three-quarters.
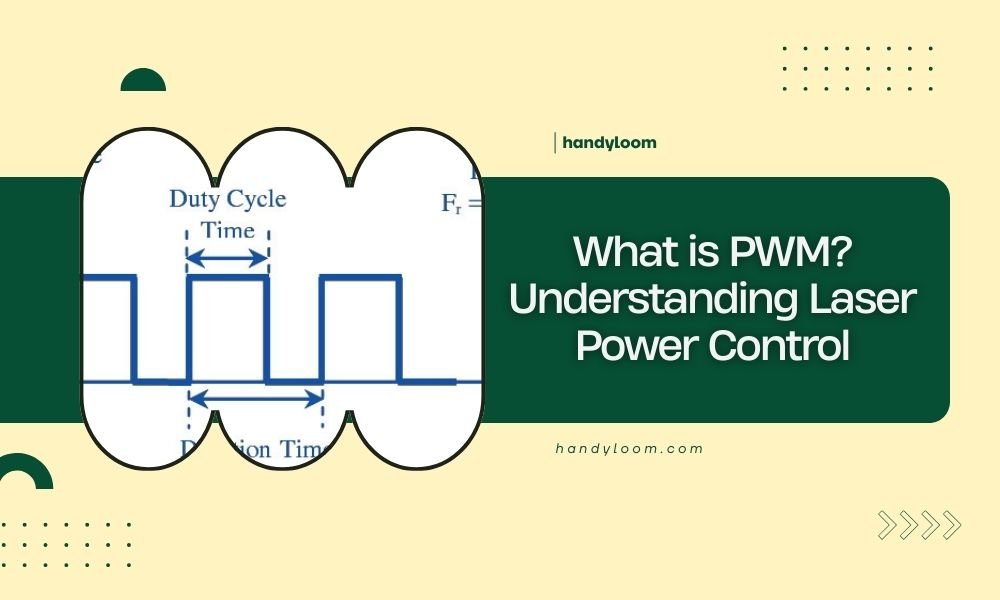
The Basic PWM Cycle Explained
Every PWM cycle has two parts: the “on” time and the “off” time. The total cycle time stays constant, but the ratio between on and off changes.
Your laser controller measures this ratio as a percentage. Higher percentages mean longer “on” times and more power delivered to your material.
Duty Cycle Percentage Breakdown
- 10% duty cycle: Laser fires for 10% of each cycle
- 50% duty cycle: Laser fires for half of each cycle
- 90% duty cycle: Laser fires for 90% of each cycle
- 100% duty cycle: Laser stays on continuously
Why Laser Manufacturers Choose PWM Technology
I found that most laser manufacturers prefer PWM because it gives you precise control without generating excess heat. Traditional analog power control wastes energy as heat, which can damage your laser tube.
PWM switches are either fully on or fully off, so they don’t waste energy in between states. This keeps your laser cooler and extends its lifespan.
PWM vs Analog Power Control
| Feature | PWM Control | Analog Control |
|---|---|---|
| Heat Generation | Minimal | High |
| Power Precision | Very High | Moderate |
| Energy Efficiency | Excellent | Poor |
| Cost | Low | Higher |
Understanding PWM Frequency in Laser Systems
PWM frequency determines how many on-off cycles happen per second. Most laser systems run between 1,000 Hz and 20,000 Hz (1-20 kHz).
Higher frequencies create smoother cuts and engravings. Lower frequencies work better for thick materials that need more heat buildup.
High Frequency Benefits
When I researched high-frequency PWM, I found it produces cleaner edges on thin materials. The rapid pulses blend together, creating what looks like continuous power output.
You’ll get better results on paper, fabric, and thin wood with frequencies above 10 kHz. The material doesn’t have time to cool between pulses.
Best Materials for High Frequency PWM
- Paper and cardboard
- Fabric and leather
- Thin plywood (under 3mm)
- Acrylic sheets
Low Frequency Applications
Lower frequencies (1-5 kHz) let materials cool slightly between pulses. This prevents overheating and charring on thick or heat-sensitive materials.
From what I read, thick hardwoods and metals respond better to lower frequency PWM. The cooling time prevents heat buildup that causes burn marks.
Materials That Need Lower Frequencies
- Thick hardwood (over 6mm)
- Dense materials like bamboo
- Heat-sensitive plastics
- Metal engraving applications
Setting PWM Parameters for Different Projects
Your PWM settings depend on three main factors: material type, thickness, and desired finish quality. Each combination needs different power levels and frequencies.
Start with your material’s recommended settings, then adjust based on test cuts. Keep notes about what works for your specific laser and materials.
Power Percentage Guidelines
I found online that most materials have sweet spots for PWM power settings. Going too high wastes material and creates poor cuts. Too low won’t cut through completely.
Common Starting Points
- Paper: 10-20% power
- Cardboard: 20-40% power
- 3mm plywood: 40-60% power
- 6mm plywood: 60-80% power
- Acrylic: 30-50% power
Speed and Power Relationship
Faster cutting speeds need higher power percentages to maintain the same cutting depth. Slower speeds can use lower power to prevent burning.
This relationship lets you fine-tune your cuts. Need cleaner edges? Reduce power and slow down. Want faster production? Increase both power and speed proportionally.
Troubleshooting Common PWM Issues
PWM problems usually show up as inconsistent cuts, excessive burning, or incomplete cutting. Most issues come from wrong frequency or power settings.
Inconsistent Cut Depth
When your cuts vary in depth across the same piece, check your PWM frequency first. Too low frequency on thin materials causes this problem.
Try increasing frequency to 15-20 kHz for consistent results. Also verify your laser tube isn’t overheating during long jobs.
Quick Fixes for Inconsistent Cuts
- Increase PWM frequency
- Check material flatness
- Clean laser lens and mirrors
- Verify proper focus distance
Excessive Burning or Charring
Burn marks usually mean too much heat buildup. This happens with high power settings or frequencies that are too high for thick materials.
Reduce your power percentage by 10-20% and test again. For thick materials, try lowering the frequency to allow cooling time.
Preventing Heat Damage
- Lower power settings
- Increase cutting speed
- Use air assist if available
- Choose appropriate PWM frequency
Advanced PWM Features in Modern Lasers
Many experts say newer laser controllers offer variable PWM that changes during cuts. This lets you use different settings for cutting versus engraving in the same job.
Some systems adjust PWM automatically based on cutting speed changes. When the laser slows for corners, the power drops to prevent burning.
Variable PWM Benefits
Variable PWM gives you more control over complex projects. You can engrave details at low power, then switch to high power for cutting outlines.
This saves time since you don’t need to run separate jobs for different operations. Everything happens in one pass with automatic power adjustments.
Choosing the Right PWM Settings for Your Laser
Your laser’s PWM capabilities depend on its controller and power supply. Check your manual for frequency ranges and power control options.
Most hobby lasers work well with standard PWM settings. Professional systems might offer more advanced features like ramp control and pulse shaping.
Testing Your PWM Setup
Create test patterns with different power levels and frequencies. Use scrap material that matches your projects.
Document successful settings for future reference. This saves time and material on future projects using similar materials.
Conclusion
PWM gives you precise control over laser power by switching the beam on and off in rapid cycles. Understanding duty cycles, frequency selection, and material-specific settings helps you get better results from every project.
Start with recommended settings for your materials, then adjust based on test cuts. Keep notes about successful combinations, and don’t be afraid to experiment with different PWM frequencies to find what works best for your specific applications.
What happens if I set PWM frequency too high for thick materials?
High frequencies on thick materials can cause excessive heat buildup and charring. The material doesn’t get cooling time between pulses, leading to burn marks and poor cut quality. Reduce frequency to 1-5 kHz for materials over 6mm thick.
Can I use 100% PWM duty cycle for all cutting operations?
While 100% duty cycle provides maximum power, it’s not always best. Many materials cut better with lower percentages that prevent overheating. Start around 60-80% and adjust based on your results and material type.
Why does my laser make different sounds at different PWM frequencies?
The PWM switching creates audible frequencies, especially in the 1-20 kHz range. Higher frequencies often sound like high-pitched whines, while lower frequencies create deeper pulsing sounds. This is normal operation and indicates your PWM system is working.
How do I know if my laser controller supports variable PWM settings?
Check your software for power ramping options, corner power reduction, or speed-based power scaling features. Your manual should list PWM frequency ranges and control options. Basic controllers typically offer fixed frequency PWM only.
What’s the relationship between PWM frequency and cutting speed?
Higher PWM frequencies generally allow faster cutting speeds because they deliver more consistent power. Lower frequencies work better with slower speeds to give materials time to heat up properly between pulses. Match your frequency choice to your intended cutting speed.