Kerf is the width of material that gets removed when your laser cuts through it, creating a narrow gap along the cut line.
Understanding kerf helps you make precise cuts and compensate for material loss in your laser cutting projects.
Why Kerf Matters in Laser Cutting
Think of kerf like the sawdust created when you cut wood with a saw. Your laser beam doesn’t just magically separate material. It actually vaporizes a tiny strip of material as it cuts.
This vaporized material creates the kerf width. Without accounting for it, your finished pieces will be slightly smaller than expected.
The Science Behind Kerf Formation
When your laser beam hits material, it heats it to extremely high temperatures. The material melts, burns, or vaporizes depending on what you’re cutting.
This process removes a small amount of material equal to roughly the width of your laser beam. That’s your kerf.
How Wide Is Kerf on Different Materials?
Kerf width varies based on your material, laser power, and cutting speed. Here’s what I found from laser cutting resources:
| Material | Typical Kerf Width |
|---|---|
| Cardboard/Paper | 0.1-0.2mm |
| Thin Wood (3mm) | 0.15-0.25mm |
| Thick Wood (12mm) | 0.2-0.4mm |
| Acrylic | 0.1-0.3mm |
| Metal | 0.2-0.5mm |
Factors That Affect Kerf Width
Several things change how wide your kerf becomes. Let me break them down:
Laser Power Settings
Higher power creates wider kerf. More energy means more material gets vaporized.
Lower power gives you narrower cuts but might not cut all the way through thick materials.
Cutting Speed
Slower speeds create wider kerf because the laser spends more time on each spot.
Faster speeds reduce kerf width but may leave rough edges or incomplete cuts.
Material Thickness
Thicker materials often need more passes or higher power. This can increase kerf width.
The laser beam also spreads slightly as it goes deeper into thick materials.
Lens Focus
A perfectly focused beam creates the narrowest kerf. Poor focus makes wider, rougher cuts.
Your focal point should sit right at your material’s surface for best results.
How to Measure Your Kerf
You need to know your exact kerf width for precise projects. Here’s how to measure it:
The Simple Test Method
Cut a small square from your material. Measure both the cut-out piece and the hole it came from.
Subtract the piece size from the hole size. Divide by 2. That’s your kerf width.
The Ruler Test
Draw a 100mm line on your material. Cut along it. Measure each piece.
If your pieces add up to 99.8mm, your kerf is 0.2mm.
Why Test Every Material
Different materials behave differently under your laser. Wood might have 0.2mm kerf while acrylic gives you 0.15mm.
Keep notes on kerf widths for each material and thickness you use regularly.
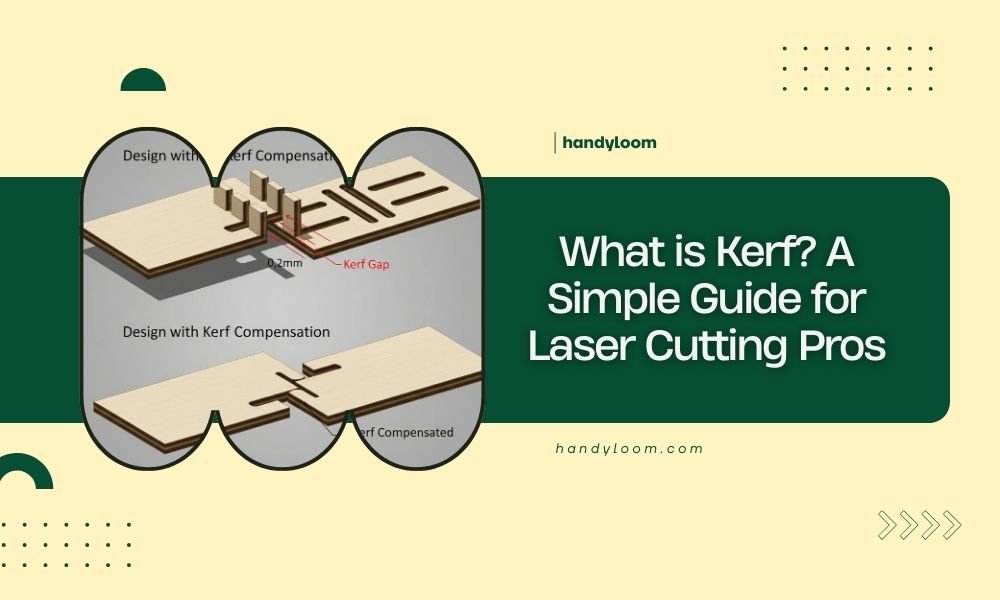
Kerf Compensation Techniques
Once you know your kerf width, you can adjust your designs to account for it.
Outside vs Inside Cuts
For pieces you want to keep, make your design slightly larger to compensate for kerf loss.
For holes or inside cuts, make them slightly smaller so they end up the right size after cutting.
Software Compensation
Most laser software lets you set kerf compensation automatically. The software adjusts your cut lines based on whether you’re cutting inside or outside a shape.
This saves you from manually calculating every adjustment.
Manual Design Adjustments
If your software doesn’t have kerf compensation, adjust your designs manually.
Add half your kerf width to outside dimensions. Subtract half from inside dimensions.
Common Kerf Problems and Solutions
Even experienced laser cutters run into kerf issues. Here are the most common ones:
Parts Don’t Fit Together
This usually means you forgot to compensate for kerf. Your tabs are too thin or your slots too narrow.
Test your joint fits on scrap material before cutting your final project.
Uneven Kerf Width
Inconsistent cutting speed or power causes this. Check your laser settings and make sure your material lies flat.
Warped material can also cause focus issues that change kerf width along your cut.
Wide Kerf on Thick Materials
Thick materials sometimes need multiple passes at lower power instead of one high-power pass.
This keeps your kerf narrower and gives you cleaner edges.
Advanced Kerf Considerations
Professional laser cutters think about kerf in more complex ways.
Kerf Angle
Your laser beam isn’t perfectly parallel. It has a slight taper that creates angled kerf walls.
This angle affects how precisely parts fit together, especially in thick materials.
Heat-Affected Zones
The area around your kerf gets heated but not vaporized. This can change material properties slightly.
Wood might char slightly. Plastics might melt and resolidify with different textures.
Minimizing Heat Effects
Use air assist to blow away heat and debris. Keep cutting speeds as fast as possible while still getting clean cuts.
Multiple light passes often work better than single heavy passes.
Kerf in Different Project Types
How much kerf matters depends on what you’re making.
Decorative Projects
Artwork and decorations usually don’t need precise kerf compensation. Small variations won’t hurt the final look.
Functional Parts
Gears, joints, and mechanical parts need precise kerf compensation. Even 0.1mm error can prevent proper assembly.
Prototype vs Production
Always test kerf compensation on prototypes first. Once you get the settings right, document them for future projects.
Conclusion
Kerf is simply the material your laser removes during cutting. Understanding and compensating for it separates amateur projects from professional results.
Start by measuring your kerf width for each material you use. Then adjust your designs or software settings to account for it. With practice, kerf compensation becomes second nature.
Remember that kerf width changes with different materials, thicknesses, and laser settings. Keep good notes and test cuts will save you time and materials on every project.
What happens if I ignore kerf in my designs?
Your finished pieces will be smaller than expected, and parts won’t fit together properly. Holes will be too big and tabs too thin for assembly.
Can I eliminate kerf completely?
No, kerf is unavoidable in laser cutting. The laser must remove material to create the cut. You can minimize it with proper settings but never eliminate it entirely.
Does kerf width stay the same throughout a long cut?
Kerf can vary slightly during long cuts as your laser heats up or if material thickness changes. Good ventilation and consistent material help maintain steady kerf width.
How often should I recalibrate my kerf measurements?
Check kerf width whenever you change materials, adjust laser settings, or notice fit problems. Most makers test monthly or when switching to new material batches.
Why is my kerf wider on one side of the cut?
This usually indicates focus problems or uneven material thickness. Check that your material lies completely flat and your laser is properly focused at the surface.