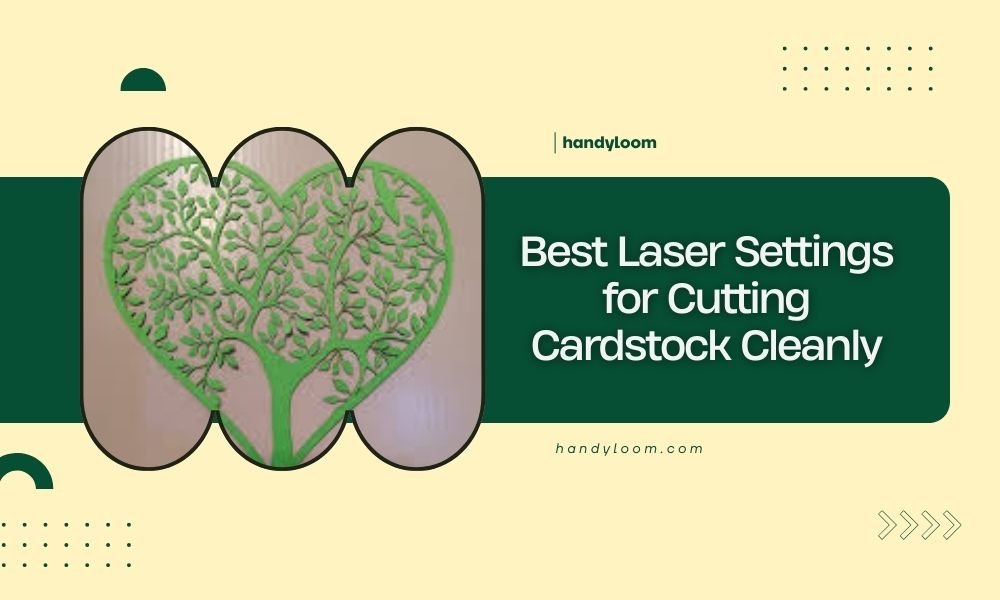
The best laser settings for cutting cardstock cleanly are 10-15% power at 100-150 mm/min speed with 1000 DPI resolution for most 250-300 GSM cardstock.
You’ll need to adjust these baseline settings based on your cardstock thickness, laser type, and desired cut quality to avoid burning or incomplete cuts.
Why Cardstock Settings Matter More Than You Think
Getting laser settings wrong on cardstock feels like trying to cut butter with a chainsaw. Too much power burns the edges. Too little leaves you with partial cuts that tear when you remove them.
I found through research that cardstock responds differently than other materials because of its fiber composition and thickness variations. The sweet spot exists, but it’s narrower than most people expect.
Understanding Your Cardstock Before You Cut
Cardstock Weight Classifications
Cardstock weight determines your starting settings. Light cardstock needs gentle treatment. Heavy cardstock demands more aggressive parameters.
- Light cardstock (65-80 GSM): Scrapbook paper, invitation cards
- Medium cardstock (200-250 GSM): Business cards, greeting cards
- Heavy cardstock (300-350 GSM): Box making, structural projects
- Extra heavy (400+ GSM): Chipboard, book covers
Cardstock Composition Effects
Different cardstock types react uniquely to laser cutting. Cotton-based cardstock cuts cleaner but costs more. Wood pulp cardstock is cheaper but burns easier.
Coated cardstock creates different challenges. The coating can bubble or discolor before the paper cuts through properly.
Essential Laser Settings for Different Cardstock Types
Light Cardstock Settings (65-80 GSM)
Start conservative with light cardstock. These thin papers burn quickly and leave you with unusable pieces if you’re too aggressive.
- Power: 8-12%
- Speed: 150-200 mm/min
- DPI: 1000
- Passes: 1
Fine-Tuning Light Cardstock
Watch for brown edges on light cardstock. That’s your signal to reduce power or increase speed. Clean cuts should show minimal discoloration.
Medium Cardstock Settings (200-250 GSM)
Medium weight cardstock gives you the most flexibility. It’s thick enough to handle reasonable power but thin enough to cut in single passes.
- Power: 12-18%
- Speed: 100-150 mm/min
- DPI: 1000
- Passes: 1-2
When to Use Multiple Passes
Two light passes often produce cleaner results than one heavy pass. You’ll get less heat buildup and reduced burning around intricate details.
Heavy Cardstock Settings (300-350 GSM)
Heavy cardstock tests your laser’s limits. You need enough power to cut through but not so much that you create charred messes.
- Power: 18-25%
- Speed: 80-120 mm/min
- DPI: 1000
- Passes: 2-3
Managing Heat Buildup in Thick Materials
Heavy cardstock holds heat longer. Allow cooling time between passes or use air assist to prevent accumulated burning.
Advanced Settings for Professional Results
DPI Settings Explained
Higher DPI doesn’t always mean better cuts. For most cardstock work, 1000 DPI provides the best balance of quality and speed.
Research shows that going above 1200 DPI on cardstock rarely improves results but significantly increases cutting time.
Air Assist Configuration
Air assist blows away debris and cools the cut zone. For cardstock, gentle air flow works better than high pressure that can blow lightweight pieces around.
When Air Assist Helps Most
- Cutting intricate patterns with small details
- Working with thick cardstock over 300 GSM
- Making multiple passes on the same piece
Common Cardstock Cutting Problems and Solutions
Burned Edges
Brown or black edges mean too much heat. Reduce power by 2-3% or increase speed by 20-30 mm/min. Sometimes switching to multiple lighter passes solves burning issues.
Incomplete Cuts
Pieces that don’t cut all the way through need more power or slower speeds. Increase power gradually in 2% increments until you achieve full cuts.
The Touch Test
Gently touch cut pieces before removing them. They should separate cleanly without tearing. If they resist, add another light pass.
Rough Cut Quality
Jagged or fuzzy edges usually indicate speed problems. Try slowing down by 25-50 mm/min while keeping the same power level.
Testing Process for New Cardstock
Creating Test Squares
Cut small test squares before starting your main project. Use 1-inch squares with different settings to find your optimal parameters.
Mark each test square with its settings. This creates a reference library for future projects with similar materials.
Progressive Testing Method
Start with conservative settings and gradually increase power or decrease speed. This prevents wasting material on overly aggressive initial attempts.
| Test Number | Power (%) | Speed (mm/min) | Quality Result |
|---|---|---|---|
| 1 | 10 | 150 | Incomplete cut |
| 2 | 12 | 150 | Clean cut, minimal brown |
| 3 | 15 | 150 | Burned edges |
Laser Type Considerations
CO2 Laser Settings
CO2 lasers work exceptionally well with cardstock. The wavelength absorbs efficiently into paper fibers, creating clean cuts with minimal heat affected zones.
Diode Laser Adjustments
Diode lasers require different approaches. They typically need higher power settings and slower speeds to achieve the same cut quality as CO2 systems.
Diode Laser Starting Points
- Multiply CO2 power settings by 1.5-2x
- Reduce speeds by 30-50%
- Expect longer cutting times
Environmental Factors That Affect Cuts
Humidity Impact
High humidity makes cardstock absorb moisture, changing how it responds to laser cutting. Damp cardstock needs slightly more power to cut cleanly.
Temperature Considerations
Cold cardstock cuts differently than room temperature material. Let stored cardstock reach room temperature before cutting for consistent results.
Conclusion
Finding the perfect laser settings for cardstock takes patience and testing, but the results are worth the effort. Start with the baseline settings provided here, then fine-tune based on your specific cardstock type and laser system. Remember that clean cuts come from balanced power and speed combinations, not maximum power settings. Keep detailed notes of what works for different materials, and you’ll build a valuable reference library for future projects.
What happens if I use too much power on cardstock?
Excessive power creates burned, charred edges and can cause the cardstock to catch fire. You’ll see brown or black discoloration and potentially holes burned completely through the material.
Can I cut multiple sheets of cardstock at once?
Stacking cardstock rarely produces good results because the laser power disperses unevenly through multiple layers. Cut one sheet at a time for best quality and consistency.
Why do my intricate designs tear when I remove them?
Delicate designs need complete cuts to avoid tearing. Reduce your cutting speed or add a second light pass to ensure all fibers are severed cleanly.
How do I prevent cardstock from warping during cutting?
Use proper material hold-downs or a vacuum bed to keep cardstock flat. Warped material creates inconsistent cutting distances and uneven results.
Should I remove the protective backing before laser cutting cardstock?
Remove any plastic or paper backing before cutting. These materials can melt onto your cardstock or create toxic fumes when heated by the laser beam.