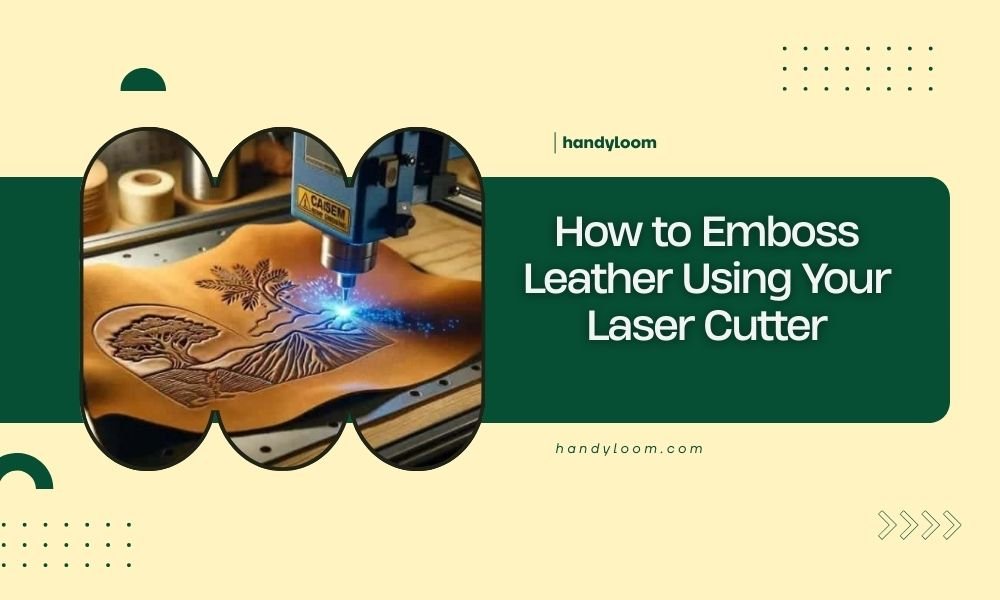
Yes, you can emboss leather using your laser cutter by adjusting the power to 10-20% and using multiple passes to create raised designs without cutting through the material.
Laser embossing leather works by heating the surface just enough to compress and darken the fibers, creating beautiful textured patterns that look professional and last for years.
What You Need to Get Started
Before you fire up that laser cutter, let’s gather your materials. You’ll need vegetable-tanned leather – it responds best to laser heat. Avoid chrome-tanned leather because it can release toxic fumes when heated.
Your design software matters too. I found that vector-based programs like Adobe Illustrator or free alternatives like Inkscape work perfectly. You’ll also want a ruler, masking tape, and some scrap leather for testing.
Choosing the Right Leather Type
Vegetable-tanned leather gives you the cleanest embossed results. It darkens beautifully under laser heat and holds crisp details.
Thickness matters more than you might think. I researched online and found that 2-4 oz leather (about 1-2mm thick) works best for beginners. Thicker leather needs more power, while thin leather can burn through easily.
Essential Equipment Checklist
- CO2 laser cutter (40W minimum recommended)
- Vegetable-tanned leather pieces
- Vector design software
- Ruler and cutting mat
- Masking tape
- Scrap leather for testing
- Ventilation system
Setting Up Your Laser Cutter
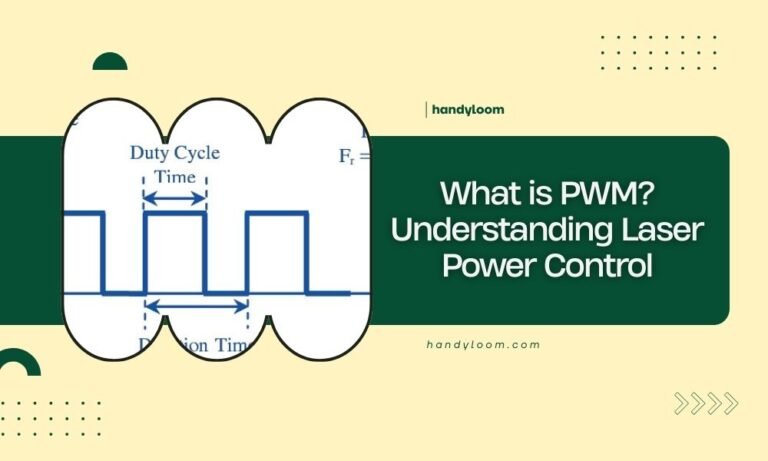
Power settings make or break your embossing project. Start with 10-15% power and 100% speed for your first test. These gentle settings heat the leather without cutting through.
Your laser bed should be perfectly level. Even small variations can create uneven embossing depth. Take a few minutes to check this before starting.
Power and Speed Settings
I came across some helpful guidelines from laser cutting experts. For light embossing, use 10% power at 100% speed. For deeper impressions, try 20% power at 80% speed.
The key is multiple passes rather than high power. Three light passes often give better results than one heavy pass.
Testing Your Settings
Always test on scrap leather first. Cut small squares and try different combinations. Write the settings next to each test piece – you’ll thank yourself later.
Focusing Your Laser Beam
Sharp focus creates clean edges. Adjust your laser head so the beam focuses right at the leather surface. A slightly defocused beam can work for very subtle embossing effects.
Creating Your Design
Simple designs work best when you’re starting out. Think bold lines, basic shapes, and clear text. Tiny details often disappear or look messy on leather.
Your design should be vector-based, not a photo. Vectors give you clean edges that translate beautifully to embossed leather.
Design File Preparation
Set your stroke width to 0.001 inches in your design software. This hairline thickness tells your laser to engrave rather than cut.
Black lines typically engrave deepest, while gray tones create lighter impressions. You can use this to add depth variation to your design.
Size and Scale Considerations
Start with designs at least 2 inches wide. Smaller details get lost in leather’s natural texture. Letters should be at least 1/4 inch tall to stay readable.
Pattern Ideas for Beginners
- Celtic knots and geometric patterns
- Floral borders and vine designs
- Monograms and simple text
- Mandala-style circular patterns
- Western tooling motifs
Step-by-Step Embossing Process
Place your leather flat on the laser bed. Remove any wrinkles or bubbles – they’ll show up in your final piece.
Secure the edges with masking tape if needed, but don’t stretch the leather. Natural relaxation is fine.
Loading and Positioning
Position your leather so the design fits comfortably within the cutting area. Leave at least 1 inch of margin on all sides.
Use your laser’s red dot pointer to preview where the design will land. This saves you from costly mistakes.
Safety Preparations
Check your ventilation system. Leather produces smoke and odors that need proper extraction. Never leave your laser unattended during embossing.
Running Your First Test
Start with a small section of your design. Watch how the leather responds to the laser heat. Good embossing creates a slight depression with darkened edges.
If you see flames or heavy smoke, stop immediately and reduce power. Leather should darken and compress, not burn.
Making Adjustments
Too light? Increase power by 2-3% increments. Too dark or deep? Reduce power and increase speed slightly.
Common Problems and Solutions
Burned edges happen when your power is too high. Reduce power and try multiple passes instead of one heavy pass.
Uneven embossing usually means your leather wasn’t flat or your laser bed needs adjustment.
Troubleshooting Weak Impressions
If your embossing looks too faint, try slowing down the cutting speed before increasing power. Slower speeds give the heat more time to work.
Sometimes the leather type is the culprit. Chrome-tanned leather resists embossing more than vegetable-tanned options.
Fixing Overheated Areas
Slightly burned spots can often be cleaned up with fine sandpaper. Sand gently with the grain direction.
Dealing with Smoke Stains
Good ventilation prevents most smoke staining. If you get light stains, a damp cloth often removes them while the leather is still warm.
| Problem | Likely Cause | Quick Fix |
|---|---|---|
| Burned edges | Power too high | Reduce power, multiple passes |
| Weak impression | Speed too fast | Slow down cutting speed |
| Uneven depth | Unlevel surface | Check bed level, flatten leather |
| Smoke stains | Poor ventilation | Improve airflow, clean while warm |
Advanced Techniques
Once you master basic embossing, try layered designs. Use different power settings for various elements to create depth variation.
Grayscale images can create stunning photographic effects on leather. The laser interprets different gray levels as varying power intensities.
Multi-Pass Embossing
Running the same design multiple times deepens the impression gradually. This gives you better control than using high power from the start.
I found online that many professionals use 3-5 passes at low power rather than single high-power passes.
Creating Texture Variations
Different line weights in your design create different embossing depths. Use this to add visual interest and hierarchy to your patterns.
Finishing Your Embossed Leather
Let your leather cool completely before handling. The embossed areas stay warm longer than you’d expect.
Light conditioning brings out the contrast between embossed and natural areas. Use a small amount of leather conditioner applied with a soft cloth.
Conditioning and Protection
Apply conditioner sparingly to avoid darkening the entire piece. Focus on areas that weren’t embossed to maintain contrast.
A light coat of leather protector helps your embossed piece resist moisture and wear.
Conclusion
Laser embossing leather opens up amazing creative possibilities for your projects. Start with simple designs and low power settings, then work your way up to more complex patterns. Remember that patience and practice beat rushing with high power every time. Your leather pieces will look professional and last for years when you take the time to get your settings right. The key is testing, adjusting, and enjoying the process of creating something beautiful and unique.
Can I emboss any type of leather with a laser cutter?
Vegetable-tanned leather works best for laser embossing, while chrome-tanned leather can release harmful fumes and doesn’t emboss as cleanly. Stick with natural, vegetable-tanned options for safety and best results.
How deep should laser embossing go into the leather?
Good embossing creates a depression about 10-20% of the leather’s thickness. On 2mm leather, aim for impressions around 0.2-0.4mm deep. Deeper impressions risk weakening the leather structure.
What’s the minimum laser power needed for leather embossing?
A 40W CO2 laser provides enough power for most leather embossing projects. Lower wattage machines can work but may require very slow speeds and multiple passes to achieve good results.
Why does my embossed leather look uneven?
Uneven embossing typically results from unlevel laser beds, wrinkled leather, or inconsistent material thickness. Always flatten your leather and check your machine’s calibration before starting projects.
How long does laser-embossed leather last compared to traditional tooling?
Properly done laser embossing lasts just as long as traditional leather tooling. The heat treatment actually hardens the embossed areas, making them quite durable when the leather is properly cared for afterward.