DIY laser engraved acrylic awards combine precision cutting with creative design to create professional-looking recognition pieces at home.
You can make stunning custom acrylic awards using basic laser cutting equipment, design software, and quality acrylic materials in just a few hours.
Essential Materials for Laser Engraved Acrylic Awards
Getting the right materials makes all the difference in your final product. You need quality acrylic sheets, proper laser settings, and basic finishing supplies.
Choosing the Right Acrylic Type
Cast acrylic works best for awards because it cuts cleanly and engraves beautifully. Extruded acrylic tends to crack and doesn’t give you that professional finish.
I found that 3-6mm thick acrylic sheets provide the perfect balance. Too thin and your award looks cheap. Too thick and you waste material and laser time.
Clear vs Colored Acrylic Options
Clear acrylic creates that classic award look everyone recognizes. Colored options like blue, green, or amber add personality but can make text harder to read.
Frosted acrylic gives a sophisticated matte finish that hides fingerprints better than clear options.
Design Software and File Preparation
Your design determines everything about the final award. Simple, clean designs always work better than busy, complicated ones.
Best Software for Award Design
Adobe Illustrator remains the gold standard for laser cutting designs. It handles vector graphics perfectly and exports clean files.
Free alternatives like Inkscape work great too. I’ve used both and found Inkscape handles basic award designs without any problems.
Setting Up Your Canvas
Start with your actual acrylic sheet dimensions. A typical award might be 6×8 inches, but you can go smaller for desk awards or larger for wall displays.
Creating Text That Engraves Well
Sans-serif fonts like Arial or Helvetica engrave much cleaner than fancy script fonts. Keep text at least 12pt size for good readability.
Bold text engraves deeper and looks more professional than thin, delicate fonts that might not show up well.
Vector vs Raster Graphics
Use vector graphics for cutting lines and simple engraving. They scale perfectly and cut with crisp edges.
Raster images work for photo engraving but take much longer and use more laser time.
Laser Settings and Parameters
Getting your laser settings right prevents cracked acrylic, messy cuts, and poor engraving quality.
Power and Speed Settings
For 3mm clear acrylic, I found that 70% power at 10mm/min speed cuts cleanly without melting. Your laser might need different settings.
Engraving typically uses 30-40% power at much higher speeds around 500-800mm/min.
Multiple Pass Techniques
Sometimes multiple light passes work better than one heavy pass. This prevents heat buildup that can crack your acrylic.
Start conservative and add more passes if needed. You can’t undo a cracked piece.
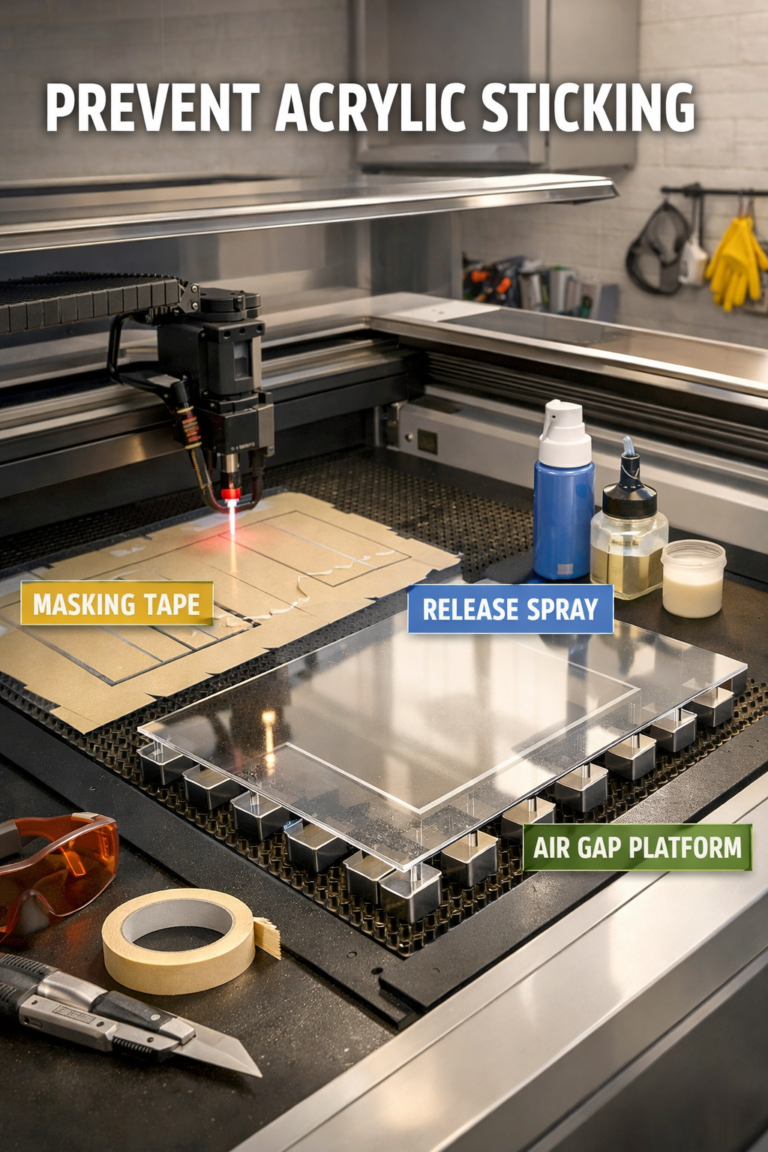
Air Assist and Cooling
Air assist blows away melted acrylic debris and prevents flame-polished edges from forming. Most home lasers include this feature.
Good ventilation keeps fumes away and prevents heat buildup in your material.
Step-by-Step Award Creation Process
Following a systematic approach gives you consistent results every time you make awards.
Design Layout and Planning
Sketch your award design first. Where will the text go? Do you want decorative elements? How will the person display it?
Plan your material usage. You can often fit multiple small awards on one sheet if you arrange them smartly.
Creating Award Templates
Make a basic template with placeholder text. This lets you quickly customize awards for different recipients without starting from scratch.
Text Positioning and Hierarchy
Put the most important information (person’s name or achievement) largest and most prominent. Supporting details can be smaller.
Leave enough white space. Cramped text looks amateur and hard to read.
Cutting and Engraving Order
Always engrave first, then cut. This prevents your pieces from moving around during the process.
Position engravings away from cut lines by at least 5mm. This prevents stress cracks from forming.
Finishing Techniques
Raw laser-cut acrylic looks good, but a few finishing touches make your awards look truly professional.
Edge Polishing Methods
Flame polishing creates crystal-clear edges quickly. Pass a torch flame lightly over cut edges to melt and smooth them.
Sanding with progressively finer grits (400, 800, 1200, then polish) takes longer but gives you more control.
Safety During Flame Polishing
Work in a ventilated area with a fire extinguisher nearby. Acrylic melts fast and can ignite if overheated.
Practice on scrap pieces first. It’s easy to ruin a finished award if you’re not comfortable with the technique.
Adding Color to Engravings
Acrylic paint fills engraved areas nicely. Apply paint, let dry, then sand off the excess from the surface.
Gold and silver paints create that traditional award look most people expect.
Paint Application Tips
Use thin coats rather than one thick application. Multiple thin layers fill better and look smoother.
Mask surrounding areas with tape to prevent accidental paint smears.
Stand and Base Options
Your award needs a way to stand up and display properly. Several options work well with acrylic awards.
Integrated Stand Designs
Cut the stand from the same acrylic sheet using tabs and slots. This creates a seamless look but uses more material.
Angled stands around 15-20 degrees display awards nicely on desks or shelves.
Separate Base Materials
Wood bases add warmth and contrast to clear acrylic awards. Walnut and oak work particularly well.
Metal bases create a more modern, industrial look. Brushed aluminum or steel complement acrylic nicely.
| Base Material | Pros | Cons |
|---|---|---|
| Acrylic | Matches award, easy to laser cut | Can look plain, scratches easily |
| Wood | Warm appearance, durable | Requires different tools/skills |
| Metal | Very professional look | Expensive, needs special equipment |
Common Problems and Solutions
Even experienced makers run into issues. Here are the most common problems and how to fix them.
Cracking Issues
Stress cracks usually happen from too much heat or cutting too fast. Slow down your cutting speed and reduce power slightly.
Sharp internal corners create stress points. Add small radius curves instead of perfect 90-degree corners.
Preventing Heat Damage
Let your laser cool between pieces if you’re making multiple awards. Hot acrylic cracks much easier than cool material.
Poor Engraving Quality
Blurry or inconsistent engraving often means your laser needs cleaning or your material isn’t flat.
Remove the protective film before engraving. Leaving it on can cause uneven results and poor text quality.
Depth Consistency Problems
Test engrave on scrap material first. Different acrylic batches can behave differently even with identical settings.
Cost Analysis and Budgeting
Understanding your costs helps price awards appropriately and choose cost-effective materials.
Material Costs per Award
A typical 6×8 inch award uses about $3-5 in acrylic material. Colored or specialty acrylics cost more than clear sheets.
Paint, bases, and finishing supplies add another $1-3 per award depending on your choices.
Time Investment
Simple awards take 15-20 minutes of laser time plus 10-15 minutes of finishing work. Complex designs can take much longer.
Batch processing multiple awards saves time on setup and material handling.
Conclusion
Creating DIY laser engraved acrylic awards gives you complete control over design, quality, and cost. With the right materials, proper laser settings, and basic finishing techniques, you can produce professional-looking awards that recipients will treasure.
Start with simple designs to master the basics, then expand into more complex projects as your skills improve. The combination of precision laser cutting and creative design possibilities makes acrylic awards an excellent project for makers of all skill levels.
What thickness of acrylic works best for awards?
3-6mm thick acrylic provides the best balance of professional appearance and material efficiency. Thinner sheets look cheap while thicker ones waste material and laser time without significant benefit.
Can you laser cut acrylic without protective film?
Yes, but protective film prevents scratches during handling and storage. Remove it just before laser processing for best results, as the film can interfere with cutting and engraving quality.
How do you prevent acrylic from cracking during cutting?
Use lower power settings with multiple passes rather than high power single passes. Add radius curves to sharp corners and ensure your acrylic sheet lies completely flat on the laser bed.
What’s the best way to clean acrylic awards after making them?
Use mild soap and water with a soft cloth. Avoid ammonia-based cleaners or abrasive materials that can scratch the surface. For stubborn residue, try isopropyl alcohol on a clean cloth.
How long do laser engraved acrylic awards typically last?
Quality acrylic awards can last decades when properly cared for. Keep them away from direct sunlight to prevent yellowing and store in dust-free environments to maintain their appearance.