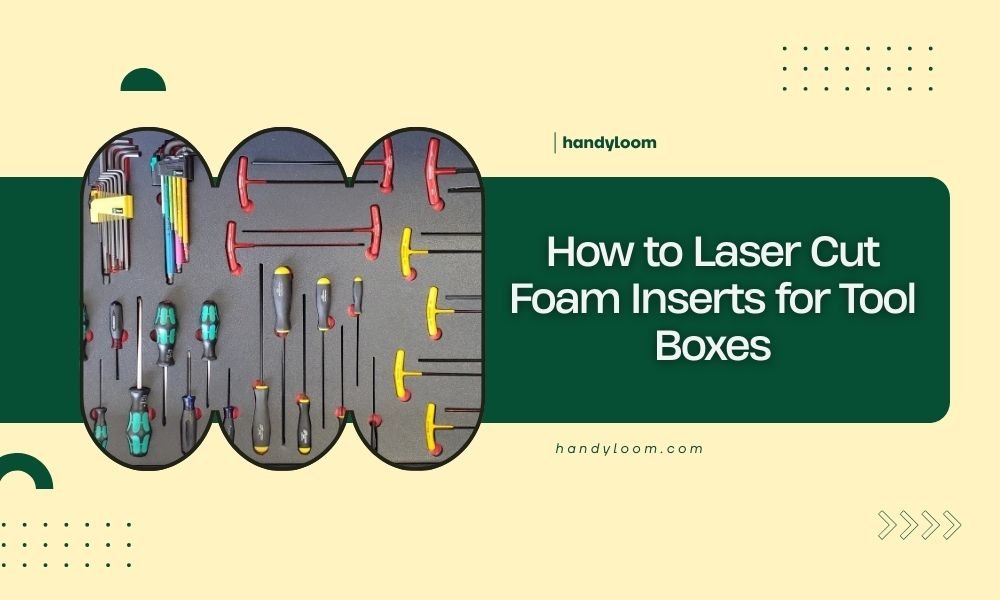
To laser cut foam inserts for tool boxes, set your laser to low power settings (10-30%), use slow cutting speeds, and ensure proper ventilation for safe foam cutting.
Choose closed-cell foam materials like EVA or polyethylene foam, create your design template first, then adjust laser parameters based on foam thickness and density.
Why Laser Cut Foam Inserts Beat Store-Bought Options
You’ve probably stared at your messy tool box and thought, “There has to be a better way.” There is. Custom laser cut foam inserts transform chaos into organized bliss.
Store-bought foam inserts never fit your exact tools. They’re generic, expensive, and often leave you cramming tools into spaces that don’t quite work.
Laser cutting lets you create perfect cutouts for every screwdriver, wrench, and specialty tool you own. No more hunting for that one socket that always goes missing.
Essential Materials for Laser Cut Tool Box Inserts
Best Foam Types for Laser Cutting
Not all foam plays nice with laser cutters. I researched which types work best and found clear winners.
EVA foam tops the list. It cuts clean, doesn’t produce toxic fumes, and comes in various densities. You’ll find it in craft stores and online suppliers.
Polyethylene foam runs a close second. It’s chemical resistant and bounces back after compression. Perfect for heavy tools that might dent softer materials.
Foams to Avoid
Polyurethane foam releases dangerous gases when laser cut. Skip it completely. Same goes for PVC foam – the chlorine creates toxic fumes.
Polystyrene foam melts more than cuts. You’ll end up with messy, sealed edges instead of clean lines.
Thickness Guidelines
Tool box depth determines foam thickness. Measure your box interior height first.
Most tool boxes work well with 1-2 inch thick foam. Thicker foam means deeper cutouts but less overall storage space.
Design Your Perfect Tool Layout
Measuring and Planning Your Tools
Start by laying all your tools on a table. Group them by size and frequency of use. Tools you grab daily should go in easy-reach spots.
Measure each tool’s length, width, and thickness. Add 2-3mm to each dimension for easy removal. Tools shouldn’t require wrestling to get out.
Creating Your Template
Paper templates save time and material. Cut cardboard pieces matching your tool shapes. Arrange them until the layout feels right.
Take a photo of your final arrangement. You’ll reference it when creating your digital file.
Digital Design Software Options
Free software works great for beginners. Inkscape handles vector graphics and exports to common laser formats.
Fusion 360 offers more advanced features if you want 3D modeling. Many makerspaces provide free access to professional software.
Design Tips That Save Time
Use simple shapes when possible. Rectangles and circles cut faster than complex curves.
Add small tabs or bridges for delicate cutouts. They prevent small pieces from falling through during cutting.
Laser Cutter Settings and Parameters
Power and Speed Settings
Foam burns easily, so start conservative. I found that 10-20% power works for most foam types under 1 inch thick.
Slow speeds produce cleaner cuts. Try 100-200mm per minute initially. You can always increase speed once you dial in the settings.
| Foam Type | Thickness | Power % | Speed (mm/min) |
|---|---|---|---|
| EVA Foam | 1/2 inch | 15% | 150 |
| EVA Foam | 1 inch | 25% | 100 |
| Polyethylene | 1/2 inch | 20% | 120 |
| Polyethylene | 1 inch | 30% | 80 |
Test Cuts Are Your Friend
Always run test cuts on scrap foam first. Cut small squares with different settings until you find what works.
Good cuts go completely through without excessive melting or charring. The edges should feel smooth, not sticky.
Ventilation and Safety
Even safe foams produce fumes when cut. Ensure your laser cutter’s exhaust system works properly.
Keep a fire extinguisher nearby. Foam can ignite if power settings run too high.
Step-by-Step Cutting Process
Preparing Your Foam
Clean foam surfaces with a dry cloth. Dust and debris can interfere with cutting quality.
Secure foam to your laser bed using weights or tape at the corners. Moving material ruins cuts.
File Preparation
Convert your design to vector format (SVG or DXF). Raster images won’t cut properly.
Double-check dimensions in your laser software. A small scaling error makes tools not fit.
Making the Cut
Start your exhaust fan before firing the laser. Let it run for a few minutes after cutting finishes.
Watch the first few cuts closely. Stop immediately if you see flames or excessive smoke.
Multi-Pass Techniques
Thick foam might need multiple passes at lower power. This prevents burning while ensuring complete cuts.
Two passes at 15% power often work better than one pass at 30% power.
Finishing and Installation Tips
Cleaning Cut Edges
Some foam types leave slight residue on cut edges. A damp cloth removes most buildup.
Fine sandpaper smooths any rough spots. Use 220 grit or finer to avoid tearing the foam.
Testing Tool Fit
Test each cutout with its intended tool. Tight fits cause frustration during daily use.
Trim cutouts slightly larger if tools stick. It’s easier to remove material than add it back.
Securing Inserts in Tool Boxes
Most foam inserts stay put from friction alone. Dense foam compresses slightly for a snug fit.
Double-sided tape works for boxes that get moved frequently. Apply tape sparingly to avoid permanent attachment.
Common Problems and Solutions
Melted or Sealed Edges
This happens when power settings run too high. Reduce power by 5% increments and test again.
Increase cutting speed slightly. Faster movement reduces heat buildup in one spot.
Incomplete Cuts
Raise power gradually or add a second pass. Some foam densities need more energy to cut through.
Check your laser focus. Poor focus spreads energy and reduces cutting effectiveness.
Charring and Discoloration
Lower power and increase air assist if available. Extra airflow removes heat and debris.
Some slight discoloration is normal. Dark edges actually help define tool shapes visually.
Cost Analysis: DIY vs Store-Bought
Material Costs
A sheet of EVA foam costs $15-25 and makes inserts for multiple tool boxes. Store-bought foam inserts run $40-80 each.
Laser cutting time typically costs $10-20 per hour at makerspaces. Most projects finish in 30 minutes.
Time Investment
Design work takes 1-2 hours for your first project. Cutting happens in minutes once you start.
Compare this to driving around hunting for inserts that might fit your tools. Custom wins every time.
Maintenance and Longevity
Caring for Foam Inserts
Foam inserts last years with basic care. Vacuum out debris monthly to prevent buildup.
Oil stains wipe clean with degreaser. Most foams resist common workshop chemicals.
When to Replace
Replace inserts when they lose their shape or develop tears. Quality foam maintains its structure for 3-5 years of regular use.
Tool collections grow over time. Design new inserts as you add tools rather than cramming them in existing spaces.
Advanced Techniques
Multi-Layer Designs
Stack thin foam layers for complex tool shapes. Cut different levels for handles and heads.
Contrasting foam colors create visual guides. Dark bottom layers make missing tools obvious.
Engraving Labels
Light laser engraving adds tool labels without cutting through. Use 5% power for surface marking.
Label uncommon tools that might get misplaced. Socket sizes work great for this technique.
Conclusion
Laser cutting foam inserts transforms your tool organization from frustrating to functional. You’ll save money compared to store-bought options while getting perfect fits for every tool.
Start with simple designs and safe foam materials like EVA. Master the basics before attempting complex multi-layer projects. Your future self will thank you every time you reach for a tool and find it exactly where it belongs.
The initial time investment pays dividends in daily efficiency. No more hunting through cluttered drawers or buying duplicate tools you already own but can’t find.
What foam thickness works best for standard tool boxes?
Most standard tool boxes work well with 1 to 1.5 inch thick foam. This provides enough depth for tool handles while leaving room for the box lid to close properly. Measure your box interior height and subtract 1/4 inch for clearance.
Can I laser cut foam without creating toxic fumes?
Yes, by choosing the right materials. EVA foam and polyethylene foam produce minimal, non-toxic fumes when laser cut. Always avoid PVC foam, polyurethane, and polystyrene which release dangerous gases. Proper ventilation remains important even with safe materials.
How do I prevent my tools from sticking in the foam cutouts?
Add 2-3mm extra space around each tool outline when designing your template. Tools should slide in and out easily without force. If cutouts feel tight after cutting, use fine sandpaper to enlarge them gradually until the fit feels comfortable.
What’s the best way to arrange tools for maximum efficiency?
Place your most frequently used tools in the easiest-to-reach positions. Group related tools together – all screwdrivers in one area, all wrenches in another. Leave some empty spaces for future tool additions rather than cramming everything tightly.
How long do laser cut foam inserts typically last?
Quality EVA or polyethylene foam inserts last 3-5 years with regular workshop use. The foam maintains its shape and cushioning properties well. Replace inserts when they develop tears, lose their bounce-back, or when your tool collection changes significantly.